Maximum Ducting Project II. More Mods.

Enclosures and acoustic damping to help quiet them.

Moderators: NeilBlanchard, Ralf Hutter, sthayashi, Devonavar

Post Reply
Bluefront
*Lifetime Patron*
Posts: 5316
Joined: Sat Jan 18, 2003 2:19 pm
Location: St Louis (county) Missouri USA

Maximum Ducting Project II. More Mods.

Post by Bluefront » Tue Jan 22, 2008 2:48 pm

I'm enthused about this airflow technique.....so much so, this is the third project in a row to use it. Basically it's a bottom to top airflow, with a big duct to contain the airflow, and directing it over the hot parts of the board. Much of the air goes through the Ninja, but at least 1/2 goes over the board itself. Everything that gets hot is in the flow path.

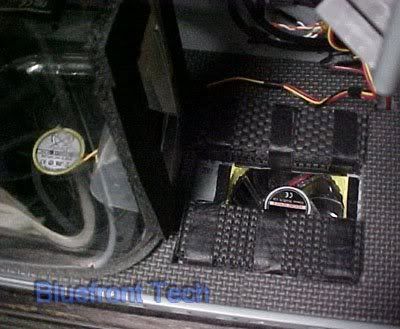
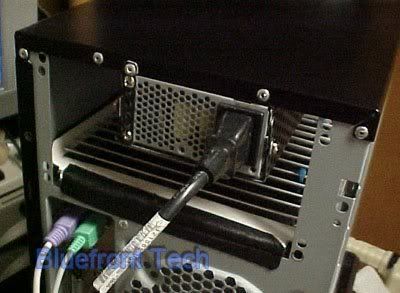
As an exhaust.....take your pick. You can use a regular PSU and a rear exhaust fan. Or cut a hole in the top of the case and let the exhaust escape. Or put a small Sparkle in the normal PSU hole, and let the exhaust go around it. Or....use your imagination. I have only touched on a few options.

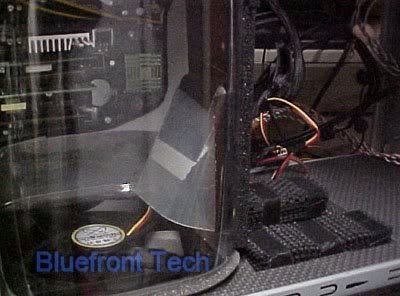
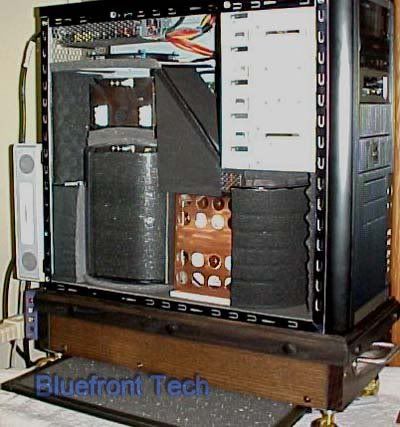
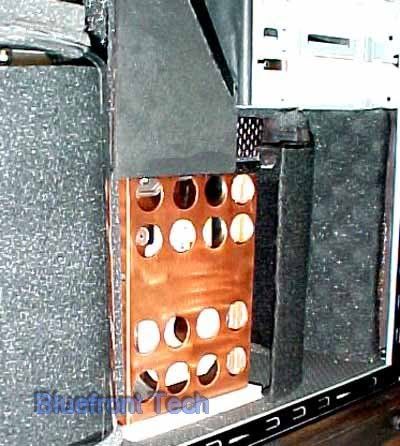
It's not hard to do. After you line up the heatsink with the board installed, you cut one hole in the bottom. If you don't like the setup....cover the hole back up.

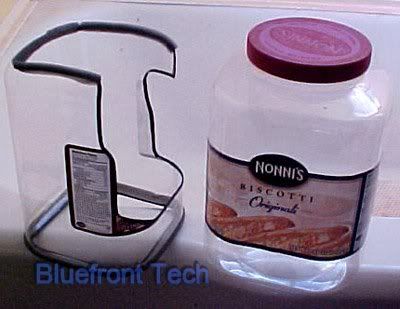
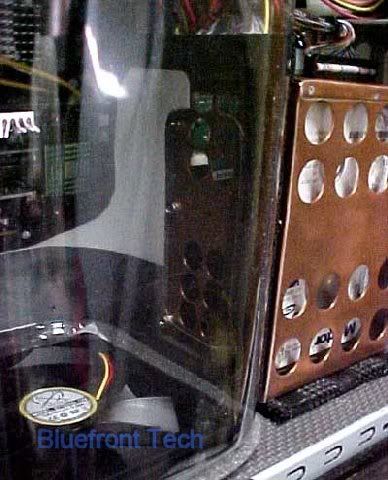
The duct....easy. I cut up a plastic cookie jar, using a tin snip. If you screw up, no big deal.....buy more cookies.

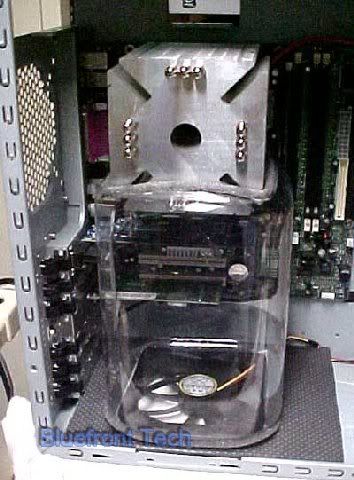
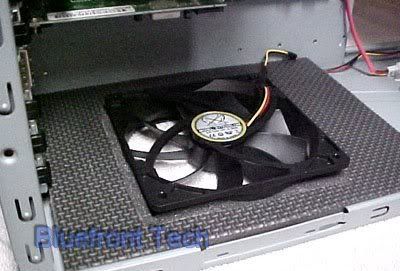
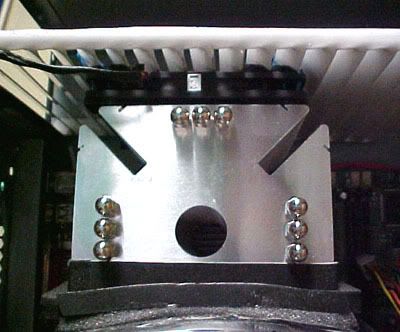
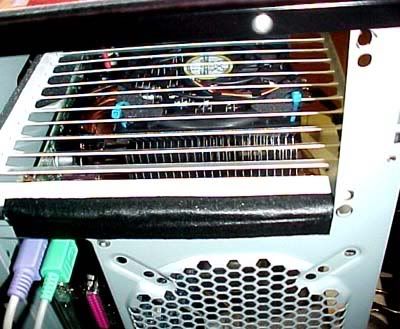
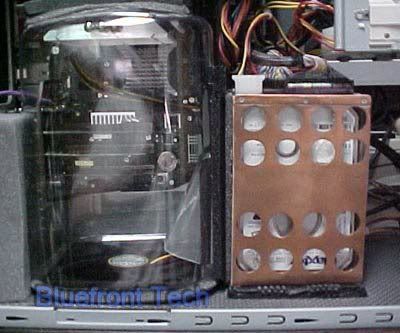
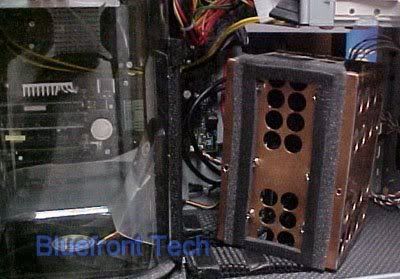
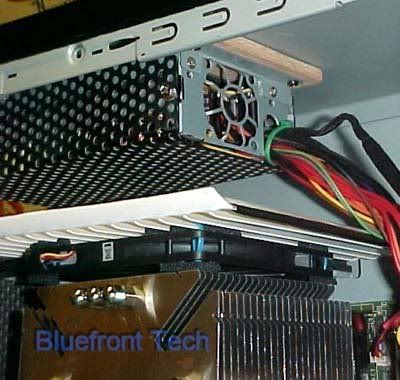
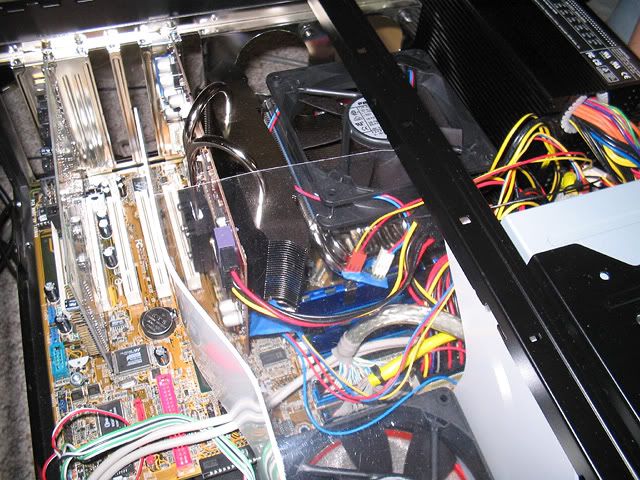
On this project I'm using an ATX case with a MATX board. A case with a width of at least 7.8" is a must to get enough clearance. And 1/2 height cards give the best result, but a full sized video card will work....tight fit. The ATX case gives me enough clearance to mount the single fan inside the case. I cut out a piece of 5/8" safety mat foam, lined it with softer window seal foam. The fan is just held snugly by the foam, sticking out slightly. This gives a lip that the plastic duct slips over, and is located by this fan lip. No other attachment is needed.

There's a lot more to go with this project. I'd like to see some of you guys duplicate this setup. The custom HD mount is next.....you'll like it. Stay tuned......

Image

Image

Image
Last edited by Bluefront on Mon Jan 28, 2008 4:40 am, edited 2 times in total.

spookmineer
Patron of SPCR
Posts: 749
Joined: Sat Nov 11, 2006 6:02 pm

Post by spookmineer » Tue Jan 22, 2008 4:34 pm

Very creative as usual! I'd like to try something like this (actually before I bought my new parts I saved up a fair few plastic bottles - milk, olive oil, washing powder) but my video card is in the way :?

zorrt
Posts: 58
Joined: Tue Oct 16, 2007 1:13 am

Post by zorrt » Wed Jan 23, 2008 12:06 am

Looks kinda pretty. Does is do anything with temps though? I've tried ducting my cpu before but couldn't stand the noise so I unduct it.

Btw, why does all your photos looks like they were taking from the 70's?

Bluefront
*Lifetime Patron*
Posts: 5316
Joined: Sat Jan 18, 2003 2:19 pm
Location: St Louis (county) Missouri USA

Post by Bluefront » Wed Jan 23, 2008 4:22 am

Since I have done extensive experimentation with this airflow design, I can tell you that it handles cooling better than any single fan design I've ever tried.....by far, and quietly also.

I think the problem with most duct-setups is that the diameter of the duct is too small, forcing the airflow through too narrow of a passage. This avoids that problem. When finished, I'll line the duct inside and out with a layer of felt or thin acoustic foam like Paxmate.

The ducted airflow makes the maximum use of whatever amount of airflow your fan is pushing, and everything can be included in the airflow path with this single duct....even the hard drives, as you'll see later on.

The pictures I post are very low res......so everyone can view them even when using dial-up. And I don't look at them as pictures....they're simply ideas, visually represented to avoid a lot of typing. :lol:

Oh....I've tried this particular setup without the duct in place. The current P4-2.4 is maxing out under 38C, with an 800RPM Enermax fan at about 9V. With the duct in place, the CPU runs slightly cooler, but everything else is much cooler.

Bluefront
*Lifetime Patron*
Posts: 5316
Joined: Sat Jan 18, 2003 2:19 pm
Location: St Louis (county) Missouri USA

Post by Bluefront » Sat Jan 26, 2008 8:36 am

It's further along now. I finished the lower filter housing, which is recycled from an earlier project. It's made from 3/4" oak, with a two-tone stain pattern. The filter on the bottom is cut out of a furnace filter. It's about 6.5"x14" and should go pretty far between cleanings. And it can be removed without disturbing the case.....not as easy as my last slide-out setup, but much easier to construct.

Added resistance from the filter.....apparently not enough to measure. All the temps remained the same. This is only possible with a big surface area. The HD suspension is in testing right now.

Next step.....mount the Sparkle PSU, which I hope to run without it's internal fan. Another unique mod in store.... :lol:

Image

Image

thejamppa
Posts: 3142
Joined: Mon Feb 26, 2007 9:20 am
Location: Missing in Finnish wilderness, howling to moon with wolf brethren and walking with brother bears
Contact:

Post by thejamppa » Sat Jan 26, 2008 8:41 am

As always Bluefront you make my jaw drop open when I see your project and ideas.

Bluefront
*Lifetime Patron*
Posts: 5316
Joined: Sat Jan 18, 2003 2:19 pm
Location: St Louis (county) Missouri USA

Post by Bluefront » Sat Jan 26, 2008 1:44 pm

Thanks....here's the first use of the new Scythe 100x12mm fan, that I know about. It's attached to the underside of a louvered panel, cut out of an air vent. I've used this setup before.....it absolutely is beneficial in starting the upward airflow in a 90 degree turn toward the exhaust vent. The Sparkle mini PSU with it's fan disabled, will sit right above this fan.

This fan ramps up with the CPU temp, so it helps cool the Ninja, and it should allow me to use the Sparkle w/o it's own fan.

This second fan is unnecessary with the current P4-2.4. But...before I'm through here, this setup will be running a P4-3.4EE. About 125W under load. So a second fan will be useful. The Scythe 100x12 runs about 4V or so at an idle....can't hear it. This system with the current CPU runs extremely cool all the time. I also switched the lower fan to a Scythe Slip Stream 1200...also very quiet.

Image

Image

Bluefront
*Lifetime Patron*
Posts: 5316
Joined: Sat Jan 18, 2003 2:19 pm
Location: St Louis (county) Missouri USA

Post by Bluefront » Sun Jan 27, 2008 7:17 am

Here are a few photos of the HD suspension/heat-sink combo. This is a convertible setup that can easily be modified to make use of the big duct...or not. I need some airflow between my drives to keep them cool enough for me in any computer. I try for the mid/low 30s....that's just me.

The first setup uses the big duct only, with a little air scoop inside to divert some air into the drive cage, which butts up against the duct.

Second possibility....a fan under the HD suspension on the bottom of the case, blowing upward between the drives...doesn't need the duct.

Third possibility (no photos)....a small fan inside the duct blowing sideways into the HD cage.

Fourth possibility.....a slot cut in the duct only. Some air is blown into the drive cage.....not much, but maybe enough for you.

Fifth possibility....using only one HD. Mount the drive with the bottom-side against a hole in the duct. Probably enough cooling for one drive.

Etc....There are many ways to do this. The setup you see could handle four drives like this, maybe using two small fans blowing from below. How you set up the drive depends on a few things......

The heat output of your particular CPU. With the little air scoop in the duct, some airflow is diverted into the cage.....

The use of a full-sized video card also blocks some airflow and shouldn't be used with the scoop.

The heat of the drives....hot drives need more airflow. The second fan would work better.

As far as the suspension goes....simple. The cage is sitting on two long blocks made out of about ten layers of shelf foam. It's soft and compresses quite a bit. The height is adjustable by adding more sheets. It's effective and non-breakable...and works.

The copper cage....soldered together using .025" copper sheets. Somewhat difficult to do, but very effective. All four edges of both drives are touching the copper. The whole cage gets warm, and there's enough surface area to be effective. Right now I'm using the little fan @about 4V at an idle. The drives stay around 31C with the case open for testing. The temp will go up somewhat when everything is closed up....just increase the fan speed. That's a Scythe 80x15mm fan under the cage.

So far so good....

Image

Image

Image

Image

Image

Bluefront
*Lifetime Patron*
Posts: 5316
Joined: Sat Jan 18, 2003 2:19 pm
Location: St Louis (county) Missouri USA

Post by Bluefront » Mon Jan 28, 2008 4:29 am

The mini-Sparkle PSU is up and running without it's internal fan. I made a new cover for it, so it can be cooled by the external 100x12mm Scythe fan. I tried running the Scythe using the Sparkle fan control....hopeless. It works, but the fan takes too long to start-up. I had to run CPUBurn for 15 minutes, then the sparkle got hot enough to start the fan. But upon closing CPUBurn, the fan took way too long to ramp down. Even though the Sparkle measured under 35C all along.

So it's back to using the MB fan control for the 100x12mm Scythe. The Sparkle stays very cool running like this. I mounted the Sparkle directly over the Scythe, using a glued-on wood strip and screws in the front, and a little riveted-on hanger bracket by the exit point. Will the Sparkle be cooled enough by this setup....probably. Time will tell.

Image

Image

Bluefront
*Lifetime Patron*
Posts: 5316
Joined: Sat Jan 18, 2003 2:19 pm
Location: St Louis (county) Missouri USA

Post by Bluefront » Mon Jan 28, 2008 7:17 am

Next up....Will this maximum duct handle a full-sized video card, which blocks slightly over 1/2 of the upward airflow? The answer is yes. I don't have a really hot card or a really long card....but an AIW 2006 fits right in.

I added a small air deflector to the rear of the duct. It provides an angled channel, that prevents any airflow from contacting the bottom of the card at 90 degrees. I also closed off the vent hole to the HD cage. The drives are now being cooled by their own 80x15 fan from below.

The affect.....the CPU temp went down slightly when stressed. I guess this is caused by more airflow going through the Ninja, rather than over the MB. I cannot tell if anything else has changed temperatures. So the experiment is a success so far. A really hot card might change things however.

Image

Bluefront
*Lifetime Patron*
Posts: 5316
Joined: Sat Jan 18, 2003 2:19 pm
Location: St Louis (county) Missouri USA

Post by Bluefront » Mon Feb 04, 2008 1:40 pm

More changes....I updated the CPU to a P4-3.2 NW for now. I might save my remaining P4-3.4EE for another project. And I moved the 100x12mm Scythe fan above the louver-plate, closer to the PSU. It seems to work better this way with a PSU temp reduction, allowing me to lower the fan speed.

And I installed a VL Systems LIS2 fan controller. This allows a much lower possible fan speed, and gives me more control over the temp curve and such. Each fan is individually controlled.....and it uses Speedfan to gage temperatures, with no external sensors involved.

On to the major addition to this maximum ducting project.... I incorporated a second duct into the system, which merges a large portion of it's airflow into the main duct airflow. This uses the HD fan and the HD cage to add to the main airflow. The upward airflow is now ducted toward the Ninja and the louver plate. A part of the airflow exiting the front of the drive cage, now enters a separate chamber which routes airflow around the outer sides of the cage. So now all the sides of the cage are in direct airflow. It works fantastic.....I was able to reduce the HD fan speed (now at 25%), and at the same time lower the drive temps (they now sit at 29/30C) ambient of 24C today.

This new duct addition is hard to figure out from the photos and from the description, but it works....and is relatively easy to make. All the duct parts just pull right out in seconds....so any board changes are still very easy.

I also made the lower filter a slide out setup.....it can be removed from either side for maintenance. This setup is up and running.....despite a few minor set-backs. The on-board LAN failed completely, as did the right channel of the on-board sound. Crap....but easily fixed with a few cards.
The setup is now running so cool and quiet I hesitate to put up numbers. Nobody would believe me. :lol:

Image

Image

All photos from this project are available for viewing in this album

seraphyn
Posts: 322
Joined: Wed Nov 28, 2007 1:26 pm
Location: Netherlands

Post by seraphyn » Tue Feb 05, 2008 12:31 am

Bluefront wrote:The setup is now running so cool and quiet I hesitate to put up numbers. Nobody would believe me. :lol:
Massively cooling a Northwood will do that :D I was actually quite shocked when i put my Andy +fan on my Northwood and my other fans on max. Thing just wouldn't heat up at all. With your ducting you have the best of both worlds, silence + good cooling.

So, temps? :)

Edwood
Posts: 460
Joined: Wed Aug 28, 2002 4:48 pm
Location: My Secret Laboratory

Post by Edwood » Wed Feb 13, 2008 3:31 pm

Love the cookie jar duct.

Minimal work and looks great too.

I'm going to have to redo my ducting work soon.

Image

I don't think I'll be able to cool everything with a single 120mm fan like I hoped. Perhaps a few very slow nmt-3 controlled 80mm fans directly on each heatsink. It all depends on how the cooling does.

But I'm going to be looking at plastic jars differently now. :p

-Ed

casebuyer
Posts: 119
Joined: Mon Jan 29, 2007 10:30 pm

Post by casebuyer » Fri Feb 15, 2008 1:44 am

cool thread

Post Reply