
Hi all,
I have a new wide format printer with a really noisy fan.
It's a 24v 60mm x 25mm exhaust fan fixed onto a "tunnel" which houses some components.
Now when I removed it from its housing the noise dropped significantly.
I think most the noise is from air whistling through the tunnel and being drawn in through the little holes along it. It's acting like a whistle.
I have the fan mounted slightly askew now so it doesn't only suck through the tunnel but is offset a bit.
This is much better but...
Is this okay? I understand the reason for encompassing the components so the air is drawn right across them.
The whole thing is still way too noisy.
I would like to reduce it further and am considering the following:
removing the front of the tunnel cover completely.
Installing a quieter 80mm fan instead.
Cutting out the louvres which sit right in front of the fan.
There is also another 80mm fan above it which is quite noisy.
Can I hook up 2 12v 80mm fans running off one of these 24v supplies?
Can I get a 24v fan controller?
These things run full speed the whole time the printer is on - even when it's not doing anything.
It is an expensive printer though so I don't want to cause any harm...
24v printer fans
Moderators: NeilBlanchard, Ralf Hutter, sthayashi, Lawrence Lee
Hi again, I'm still being driven to madness by this shreeking fan.
I know I haven't explained it all too well, I was hoping to post a couple of pics.
Basically there's a 24v 60mm exhaust fan spinning full bore sucking air through a tunnel which is riddled with holes so it whistles.
It's connected by a 2 pin socket.
There's also an 80mm fan located nearby also 24v 2 pin.
This is noisy on it's own - it spins fairly fast making a whine and it's pressed up against the vent holes in the side of the case.
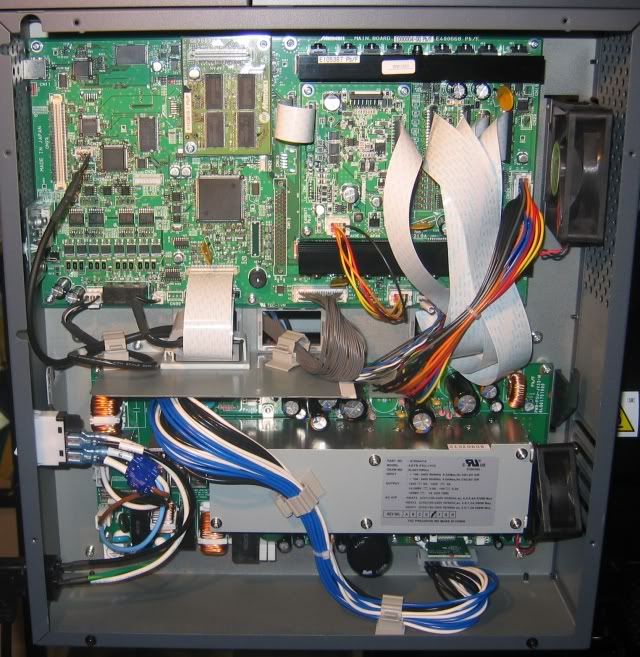
I guess I'll need to post some pics of the whole lot so you can diagnose the setup and hopefully suggest something. Other than a FBH (...big hammer!)
I know I haven't explained it all too well, I was hoping to post a couple of pics.
Basically there's a 24v 60mm exhaust fan spinning full bore sucking air through a tunnel which is riddled with holes so it whistles.
It's connected by a 2 pin socket.
There's also an 80mm fan located nearby also 24v 2 pin.
This is noisy on it's own - it spins fairly fast making a whine and it's pressed up against the vent holes in the side of the case.
I guess I'll need to post some pics of the whole lot so you can diagnose the setup and hopefully suggest something. Other than a FBH (...big hammer!)
-
dukla2000
- *Lifetime Patron*
- Posts: 1465
- Joined: Sun Mar 09, 2003 12:27 pm
- Location: Reading.England.EU
I put a zener diode on a 24V fan in an HP Laserjet that was bugging me.
BUT YMMV - my logic was that the manufacturer designs the cooling for whatever ambient temps it says in the spec. In my case it was 40 or 50C, and as my ambients are more like 20-25 I figured I was safe to detune the cooling a bit. If you have high ambients then not only are you breaching warranty, but you may well be running well beyond the design spec.
BUT YMMV - my logic was that the manufacturer designs the cooling for whatever ambient temps it says in the spec. In my case it was 40 or 50C, and as my ambients are more like 20-25 I figured I was safe to detune the cooling a bit. If you have high ambients then not only are you breaching warranty, but you may well be running well beyond the design spec.
Thanks for your response.
Yes ambient temperature may well be the key here as this machine incorporates heaters under the platen which are set around 40c.
It's not very warm around the circuitry at the moment (winter) but in summer things may get a bit more toasty.
But bear in mind the heaters are only on when it's actually printing, then they switch off. But the fans don't. So when it's just sitting there doing nothing it's still revving it's guts out.
This is what I would like to control most - so I can have it sitting quietly in between jobs, and not have to manually turn it off and on each time which causes it to reboot and do another cleaning cycle.
-
Zeroignite
- Posts: 30
- Joined: Mon Mar 09, 2009 11:54 am
- Location: Albuquerque, New Mexico
-
dukla2000
- *Lifetime Patron*
- Posts: 1465
- Joined: Sun Mar 09, 2003 12:27 pm
- Location: Reading.England.EU
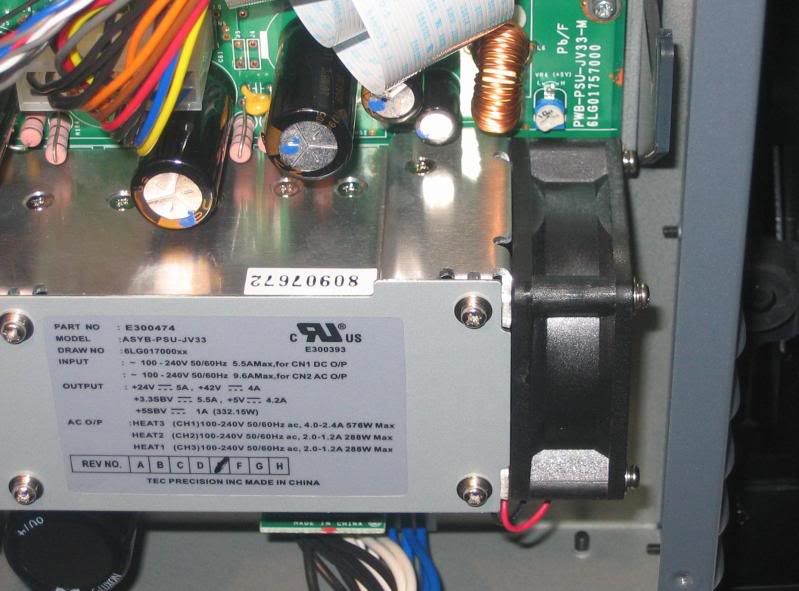
Yup - power supply. I presume the fan in your pic is exhausting air to the right.
I would start by converting those pathetic slits on the outside of the case into a proper outlet for the fan, duct the PSU/fan directly to the outside of the case and then drop the fan voltage. And/or if there is room on the case wall for an 80mm fan mount that on the case and duct it down to the 60mm opening around the psu. At the moment those crappy slits on the exterior of the printer case mean somewhere close to 100% of the exhaust air from the 60mm fan is blowing back straight around the inside of the printer. If you get it straight out of the case you significantly improve your options to slow down not only the 60mm fan but also the other 80mm you mentioned in the first post.
And/or (whether using a 60mm or 80mm fan) put in a thermally controlled fan that automatically revs up when the input air to the fan is warmer.
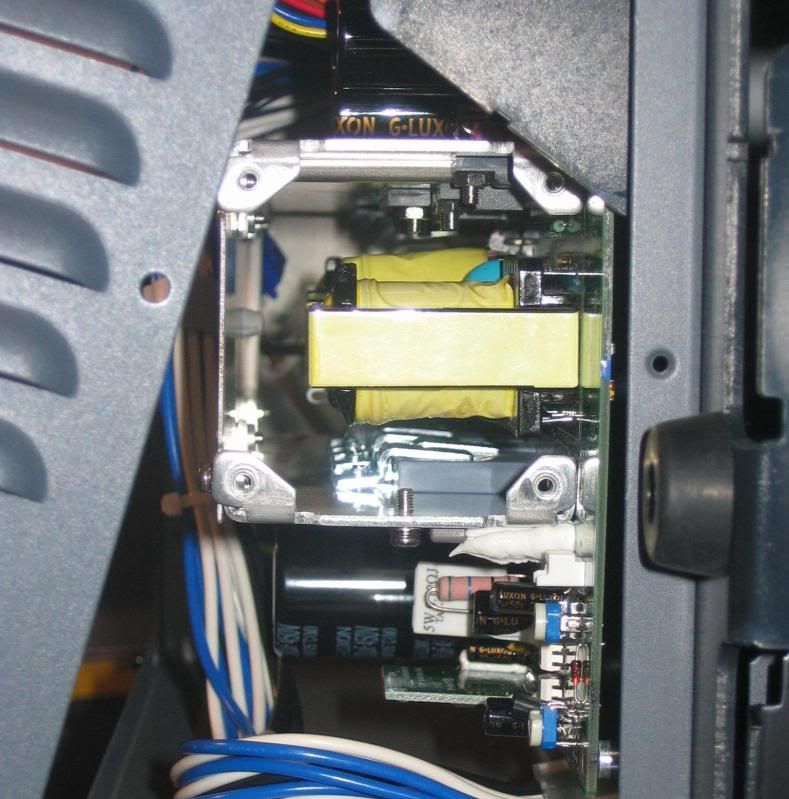
And/or take a look at the airflow into that psu enclosure and (most likely) hack open those intakes.
And/or (from the beginning) shove a temp probe in and around the psu to get an idea of temps and the success of any mods. A nice 'set' to know would be the current intake (to psu enclosure), exhaust (say 1cm from exhaust of fan) and a fixed position on that heatsink (both when printer idle and after a bit of a load) on the bottom of your second photo (not too close to any components - they obviously will be getting hot but if you measure say 1cm from them you should get an idea of how well the hs is coping/being cooled.)
The key temp you dont want to go up after any mods is the heatsink temp. I would suspect that if you open up the airflow (cut out the crappy slit vents and maybe duct the exhaust) the heatsink temp will drop.
The other issue is if the input air temp to the psu enclosure is already high (say more than 10C more than your room temp) then getting more/cooler air into the psu could be the key to your Holy Grail. The bottom line being you may be able to slow down the fan significantly as long as you keep the hs temp similar or lower to what it is currently.
ps - would urge mounting whichever fan you land up with on the exterior printer case and duct to the psu enclosure (as opposed to directly on the psu enclosure itself as at present). In your bottom pic it appears there are several components very close to the intake face of the fan, and obstructions close to a fan intake cause far more noise than the same obstructions at the same distance from the fan exhaust.
I would start by converting those pathetic slits on the outside of the case into a proper outlet for the fan, duct the PSU/fan directly to the outside of the case and then drop the fan voltage. And/or if there is room on the case wall for an 80mm fan mount that on the case and duct it down to the 60mm opening around the psu. At the moment those crappy slits on the exterior of the printer case mean somewhere close to 100% of the exhaust air from the 60mm fan is blowing back straight around the inside of the printer. If you get it straight out of the case you significantly improve your options to slow down not only the 60mm fan but also the other 80mm you mentioned in the first post.
And/or (whether using a 60mm or 80mm fan) put in a thermally controlled fan that automatically revs up when the input air to the fan is warmer.
And/or take a look at the airflow into that psu enclosure and (most likely) hack open those intakes.
And/or (from the beginning) shove a temp probe in and around the psu to get an idea of temps and the success of any mods. A nice 'set' to know would be the current intake (to psu enclosure), exhaust (say 1cm from exhaust of fan) and a fixed position on that heatsink (both when printer idle and after a bit of a load) on the bottom of your second photo (not too close to any components - they obviously will be getting hot but if you measure say 1cm from them you should get an idea of how well the hs is coping/being cooled.)
The key temp you dont want to go up after any mods is the heatsink temp. I would suspect that if you open up the airflow (cut out the crappy slit vents and maybe duct the exhaust) the heatsink temp will drop.
The other issue is if the input air temp to the psu enclosure is already high (say more than 10C more than your room temp) then getting more/cooler air into the psu could be the key to your Holy Grail. The bottom line being you may be able to slow down the fan significantly as long as you keep the hs temp similar or lower to what it is currently.
ps - would urge mounting whichever fan you land up with on the exterior printer case and duct to the psu enclosure (as opposed to directly on the psu enclosure itself as at present). In your bottom pic it appears there are several components very close to the intake face of the fan, and obstructions close to a fan intake cause far more noise than the same obstructions at the same distance from the fan exhaust.
Thanks dukla for such a concise reply. I was nodding in agreement as I read along with your suggestions.
This machine is a brand new wide format solvent printer worth about $25k USD and has a 1 year warranty, so I don't want to do anything that cant be undone ( at least for a year). And naturally I don't want to cause a meltdown!
But for the sake of my sanity I have to cut the noise down by at least 50%. I want it sitting there quietly waiting while I work on a design.
It's only about 4 metres away from my left earball!
If I may persue this further...
dukla2000 wrote: Yup - power supply. I presume the fan in your pic is exhausting air to the right.
Yes to the right straight into the louvres
I would start by converting those pathetic slits on the outside of the case into a proper outlet for the fan, duct the PSU/fan directly to the outside of the case and then drop the fan voltage. And/or if there is room on the case wall for an 80mm fan mount that on the case and duct it down to the 60mm opening around the psu.
As it's brand new I can't take to it with an angle grinder just yet, however I can remove the whole side. It unscrews from the rear casing.
At the moment those crappy slits on the exterior of the printer case mean somewhere close to 100% of the exhaust air from the 60mm fan is blowing back straight around the inside of the printer. If you get it straight out of the case you significantly improve your options to slow down not only the 60mm fan but also the other 80mm you mentioned in the first post.
Not to mention all the airflow noise coming through those slits and holes.
And/or (whether using a 60mm or 80mm fan) put in a thermally controlled fan that automatically revs up when the input air to the fan is warmer.
This I would love to do with both fans, but is this possible with 2 pin 24 v fans?
And/or take a look at the airflow into that psu enclosure and (most likely) hack open those intakes.
I can remove the front cover for the PSU, it's just screwed on.
And/or (from the beginning) shove a temp probe in and around the psu to get an idea of temps and the success of any mods. A nice 'set' to know would be the current intake (to psu enclosure), exhaust (say 1cm from exhaust of fan) and a fixed position on that heatsink (both when printer idle and after a bit of a load) on the bottom of your second photo (not too close to any components - they obviously will be getting hot but if you measure say 1cm from them you should get an idea of how well the hs is coping/being cooled.)
I had the printer running for a couple of hours straight today and the exhaust from the psu felt mildly warm - maybe 35c to my hand
The key temp you dont want to go up after any mods is the heatsink temp. I would suspect that if you open up the airflow (cut out the crappy slit vents and maybe duct the exhaust) the heatsink temp will drop.
Where's the heatsink?
The other issue is if the input air temp to the psu enclosure is already high (say more than 10C more than your room temp) then getting more/cooler air into the psu could be the key to your Holy Grail. The bottom line being you may be able to slow down the fan significantly as long as you keep the hs temp similar or lower to what it is currently.
The input air ducts in from the side of the printer - which is away from the heaters and is cool.
ps - would urge mounting whichever fan you land up with on the exterior printer case and duct to the psu enclosure (as opposed to directly on the psu enclosure itself as at present). In your bottom pic it appears there are several components very close to the intake face of the fan, and obstructions close to a fan intake cause far more noise than the same obstructions at the same distance from the fan exhaust.
Agreed.
I would like to remove the whole side panel and mount an 80mm fan to the exterior and duct it to the side of the psu. I would also like to remove the front case of the psu so it doesn't act like a whistle.
Then there's the noisy 80mm fan above.
I think removing the side panel alone will help reduce noises, but it does spin fast and makes a fair bit of a whine.
I felt only cold air exhausting from this 80mm fan when the printer was running.
So slowing these both down when not needed - either automatically or manually would be the holy grail for me.
-
dukla2000
- *Lifetime Patron*
- Posts: 1465
- Joined: Sun Mar 09, 2003 12:27 pm
- Location: Reading.England.EU
In your second pic above, there are finger like aluminium bits holding down some grey components on the bottom of the psu tunnel. On closer inspection it looks like there are also components bolted to the top of the psu 'tunnel'. So looks like the designer is using the whole psu 'tunnel' as a heatsink.Riles wrote:Where's the heatsink?
That is a killer constraint.Riles wrote:worth about $25k USD and has a 1 year warranty, so I don't want to do anything that cant be undone ( at least for a year)
From your 'overhead' shot of the whole shebang the thing that strikes me is that neither fan has a clear exhaust (crappy slits in front of the 60mm and "more tin than air" holes in front of the 80mm). So really no wonder they have to scream to be even half useful.
If, as I think you meant, you can remove the entire right hand external case wall I would start there. (Indeed that is presumably how you got the second pic.)
At which stage, if your room temp is below 25C, I would be minded to disconnect both fans and be done!
However even to get that far involves disconnecting the fans - are they on plugs into the mobo? If not you are stuffed! If they are on headers then loads of options open up. You could pop into Maplin (UK), Radioshack (US) or wherever and get some new headers and zener diodes. I would probably get 2 low speed/low noise 80mm 12V fans (Panaflo or Papst in the old days) and spec a zener to drop the 24V to around 7V. Fan Noise Solutions used to have a page on using zeners to voltage drop including sizing arithmetic. A quick peek to find the right page for you shows that site is down - I hope not permanently! Arguably fashion a replacement side from cardboard if you have any daft mammals around that are likely to explore hazardous orifices and mount the new/slow fans onto the cardboard.
In the long run cut out some nice 80mm holes in the tin and mount the fans on the tin, perhaps with wire finger guards. And perhaps duct the bottom one to the psu tunnel.
Thanks for all your suggestions dukla. I now think I know what to do!dukla2000 wrote: So looks like the designer is using the whole psu 'tunnel' as a heatsink.
There's nothing on the front cover (left side in 2nd pic) except for where the wires are held on with a plastic clip. I've unsrewed that cover now and left it dangling. That has helped somewhat. You can hear the fan work a lot harder when the cover is held back in place.
If, as I think you meant, you can remove the entire right hand external case wall I would start there. (Indeed that is presumably how you got the second pic.)
Yes I can unscrew the right hand side panel and completely remove it.
At which stage, if your room temp is below 25C, I would be minded to disconnect both fans and be done!
In summer it gets quite warm here. I'd need some "fannage" on the side!
However even to get that far involves disconnecting the fans - are they on plugs into the mobo?
Yes they are both 2 pin connectors.
If they are on headers then loads of options open up.
I would probably get 2 low speed/low noise 80mm 12V fans (Panaflo or Papst in the old days) and spec a zener to drop the 24V to around 7V.
I like that idea, can this be done with 2 pin connectors?
Arguably fashion a replacement side from cardboard if you have any daft mammals around that are likely to explore hazardous orifices and mount the new/slow fans onto the cardboard.
In the long run cut out some nice 80mm holes in the tin and mount the fans on the tin, perhaps with wire finger guards. And perhaps duct the bottom one to the psu tunnel.
I can make a new side cover for it and mount the fans directly to it and attach wire finger guards.
The existing cover is 100mm wide, I could mount 2 80mm fans to the new cover no probs. I'd rather leave the front cover off the psu entirely and not run duct to it. It sits close to the back case cover anyway so the air from the bottom fan would still be drawn across the components
I'll make the new cover and get 2 low speed/low noise 80mm 12V fans.
Then I'll "spec a zener to drop the 24V to around 7V". Whatever that is!
Don't worry, I'll get some help with that!
Cheers
Yes, thanks for that thought Xan.
I took some readings while it was printing in full flight:
Exhaust in front of 60mm fan... 24-25 degrees C
Exhaust in front of 80mm fan...23C
Temp in tunnel with fan on...24-25C
Temp in tunnel with fan disconnected...slowly increased to 30 then I plugged back in.
Then I took some readings while in standby mode:
Exhaust in front of 60mm fan... 20C
Temp in tunnel with fan on...20-21C
Temp in tunnel with fan disconnected...slowly increased to 33c over 20 mins.
As far as I can feel, the top 80mm fan is not directly cooling anything??
So I'm of the opinion that I only need to draw a little air in and past the PSU components (with the front PSU cover off) to keep that around 25C.
Why is my HP 4700 printer putting small different color spots in straight lines on paper? How can I fix it? I've cleaned it as best I can. The speck do show up on the black belt inside. But I don't see any excess in anywhere else in or around the printer. Would it be my fuser kit or something?
_______________________
yahoo keyword tool ~ overture ~ traffic estimator ~ adwords traffic estimator
_______________________
yahoo keyword tool ~ overture ~ traffic estimator ~ adwords traffic estimator