A Rubbermaid computer...now solar powered.

Enclosures and acoustic damping to help quiet them.

Moderators: NeilBlanchard, Ralf Hutter, sthayashi, Devonavar

Bluefront
*Lifetime Patron*
Posts: 5316
Joined: Sat Jan 18, 2003 2:19 pm
Location: St Louis (county) Missouri USA

A Rubbermaid computer...now solar powered.

Post by Bluefront » Wed Apr 25, 2007 4:24 am

Start off with a monitor stand....like this.

Image

Mount a MB up-side-down under the stand. Use a low/medium power CPU, with a low profile heatsink.....like an XP-120. Mount a slot blower pointed at the edge of the heatsink blowing out the side or back. Use a PICO PSU converter, a slimline optical drive in the little tray, along with a laptop drive. Might work just fine. That stand gives 6" of clearance, which should be plenty. Any takers..... :lol:

edit....I found a Rubbermaid stand I may use. Scroll down for some photos.
Last edited by Bluefront on Mon May 28, 2007 8:49 am, edited 8 times in total.

Maelwys
Posts: 85
Joined: Wed Feb 28, 2007 6:27 pm
Location: Washington D.C.

Post by Maelwys » Wed Apr 25, 2007 5:17 am

Heh heh...

That would be an excellent mod to try. If I hadn't just spent my budget on my new HTPC, I'd definitely consider giving it a shot. The Asus M2A-VM coupled with a Brisbane, a notebook drive, and slimline optical drive is powerful enough for most apps but uses just a trickle of power at idle. With that mix of components and some judicious undervolting, you might even be able to get away without using a fan at all since everything would be exposed to the open air.

frostedflakes
Posts: 1608
Joined: Tue Jan 04, 2005 4:02 pm
Location: United States

Post by frostedflakes » Wed Apr 25, 2007 5:19 am

Heh, nifty idea. But if I was going to put that much effort into a custom project, I'd probably do a behind monitor PC. :)

Bluefront
*Lifetime Patron*
Posts: 5316
Joined: Sat Jan 18, 2003 2:19 pm
Location: St Louis (county) Missouri USA

Post by Bluefront » Thu Apr 26, 2007 2:24 am

Mounting a MB and necessary components on the rear of a monitor is a possibility for a DIY build.....but with much greater difficulty than this proposed setup. Most monitors do not come with a stand/tilt mechanism that can handle the added weight easily. You would end up having to construct a heavier/wider base, and somehow a mechanism for the tilt that would not sag down. Then you would be stuck with that particular (chopped-up) monitor.

Using the (Fellowes) stand in the picture would totally eliminate all those problems, providing a completely stable base for both the computer and monitor. Hell you could even make such a base if you wanted. My idea would have enough room to shove the keyboard under the base when the computer was not in use. Right now I'm up to my eye-balls in various projects or I'd start on this project. I've got enough pieces to build the thing right now.....just no time or space to start another DIY build. :lol:

Bluefront
*Lifetime Patron*
Posts: 5316
Joined: Sat Jan 18, 2003 2:19 pm
Location: St Louis (county) Missouri USA

Post by Bluefront » Sat Apr 28, 2007 8:13 am

Damn....I found this neat Rubbermaid monitor stand at Walmart for $14. Looks like it was made for this project. It even has a cut-out for the PCI slots. You would have to use low-profile cards of course. The thing is steel, with a mesh top and front. I'll cut a hole in the rear for the I/O plate. It'll look nice. I'm not sure about the CPU heatsink......a Zalman 7000 would be nice, but I don't have one. The XP-120 will work, but I don't know about the fan. A 15mm fan would fit ok......anything taller would require some risers added to the stand legs. More to come when I find some time.......

Image

Image

Bluefront
*Lifetime Patron*
Posts: 5316
Joined: Sat Jan 18, 2003 2:19 pm
Location: St Louis (county) Missouri USA

Post by Bluefront » Sun Apr 29, 2007 6:17 am

Well I couldn't resist.....spent some time and mounted the board and the drives. I don't have a PICO psu yet, but I've run it like you see it with a std PSU hooked up. That's a 80x15mm SilenX fan on an XP-120. There's a P4-2.4 running the thing. With that single fan at about 7V, it idles about 30C (27C ambient)......maxes about 47C. When flipped over, with a monitor sitting on it, I suspect the temps will go up somewhat. I need to get a few pieces to finish this unusual project, but it looks great so far..... :D

Image

Image

IsaacKuo
Posts: 1705
Joined: Fri Jan 23, 2004 7:50 am
Location: Baton Rouge, Louisiana

Post by IsaacKuo » Sun Apr 29, 2007 7:20 am

You know, at some point I'm going to put together a "Rubbermaid" computer...except when _I_ do it, it'll be what people expect from the subject line. ;)

I've considered it more than a few times. An upside-down trash can with holes cut out appropriately could make for a nice tall "chimney" for a passive fanless system. However, I settled on using glass aquariums instead since they're cheaper and infinitely classier.

Bluefront
*Lifetime Patron*
Posts: 5316
Joined: Sat Jan 18, 2003 2:19 pm
Location: St Louis (county) Missouri USA

Post by Bluefront » Sun Apr 29, 2007 8:24 am

Well what were you expecting from a "Rubbermaid" computer. I have been unable to find this stand using a Google search. It's model# 48625 from the Rubbermaid "Office solutions" line of products. The square cut-out that I use for the PCI slots, had a USB port option. This may be a dis-continued model. The airflow from this configuration seems to work great. With the thing sitting the right direction, the airflow travels across the MB when it exits the heatsink, and it is close to the board because of convection. When the airflow reaches the edges of the board, it goes straight upward through the mesh of the top. If the base of your monitor is no bigger than the MB, this upward airflow is not blocked at all.

Issac....you need a live fish option for your aquarium case. :lol:

IsaacKuo
Posts: 1705
Joined: Fri Jan 23, 2004 7:50 am
Location: Baton Rouge, Louisiana

Post by IsaacKuo » Sun Apr 29, 2007 8:58 am

Rubbermaid is a popular maker of garbage cans.

Maelwys
Posts: 85
Joined: Wed Feb 28, 2007 6:27 pm
Location: Washington D.C.

Post by Maelwys » Mon Apr 30, 2007 5:02 am

IsaacKuo wrote:Rubbermaid is a popular maker of garbage cans.
They're also quite well known for their Tupperware. Maybe I'll build a PC into a square Tupperware box one of these days. To open the case, simply pop the lid.

Of course, heat might lead to warping, which would fubar the whole thing. Hmmm.

Bluefront
*Lifetime Patron*
Posts: 5316
Joined: Sat Jan 18, 2003 2:19 pm
Location: St Louis (county) Missouri USA

Post by Bluefront » Mon Apr 30, 2007 3:35 pm

This turned out to be a nice, very quiet, stealth computer. It avoids many of the problems of SFF setups. I can use almost any matx board. I can use all the slots, with 1/2 height cards. Many other advantages.....but a few cons also. You have to take care not to spill stuff into the computer. I'll put a solid sheet over the MB area so falling small objects won't hit the back of the board. You would have careful where to set this computer so objects would not go under the stand and hit the fan. I could construct a mesh screen to protect the bottom...might do it. Anyway it is a very different computer, unlike anything I have ever built.

Image

Image

Image

Image

Eventually I'll make a dedicated wire harness, maybe get a PICO PSU. For now there are quick-disconnects to plug in a standard PSU. It will sit behind the stand on the desk. I also intend to add some bling...maybe a temperature read-out. Anyway.....works good, very quiet, saves desk space, cost $15 plus some used parts from the junk box. :D

All the other photos are in this album. Feel free to make your own "Rubbermaid Computer".

Shukuteki
Posts: 90
Joined: Tue Dec 05, 2006 8:36 pm

Post by Shukuteki » Sat May 05, 2007 2:14 pm

This is really impressive. You could seriously make some money doing customs like this for people.

ronrem
Posts: 1066
Joined: Sun Jan 16, 2005 2:59 am
Location: Santa Cruz

Post by ronrem » Sat May 05, 2007 3:29 pm

spiffy

Had to be tempting to mount a bigfan on the top.

I've thought about a similar layout-with bigfan on top-but then using spacers to have a slid glass top about 2" above.

Another option--flip the mobo so it's hanging from the "roof" like a bat-then the bigfan is on the bottom. That would probably be a handmade wood case. Using a fanless PSU and using eSATA to locate the HDDs 6' distant it could be VERY quiet.

This-however-is pretty "pro" looking. Well done.

Bluefront
*Lifetime Patron*
Posts: 5316
Joined: Sat Jan 18, 2003 2:19 pm
Location: St Louis (county) Missouri USA

Post by Bluefront » Sat May 05, 2007 3:32 pm

Thanks.....I'd rather work for some computer outfit that would pay me for new designs. Dream on. :lol: I changed the CPU fan arrangement so the fan no longer can suck up trash . It's now a 120mm Yate Loon turned into a slot fan, blowing out the rear. It is temp controlled using a NoiseMagic NTM3. Makes the setup even quieter. But the next mods to this project will finish it off. A Pico PSU is on the way, along with an LCD information panel from the same company. More to come....

Image

mcoleg
Posts: 410
Joined: Fri Feb 23, 2007 11:55 pm

Post by mcoleg » Sat May 05, 2007 6:49 pm

very lovely

HammerSandwich
*Lifetime Patron*
Posts: 1288
Joined: Sat Oct 25, 2003 3:21 pm
Location: 15143, USA
Contact:

Post by HammerSandwich » Tue May 08, 2007 6:15 am

That's refreshingly different, Bluefront. But no air filter? Did you really build this one? :)

NARC
Posts: 42
Joined: Thu Apr 22, 2004 2:07 pm
Location: Baltimore, MD, USA
Contact:

Post by NARC » Tue May 08, 2007 8:39 am

HammerSandwich wrote:That's refreshingly different, Bluefront. But no air filter? Did you really build this one? :)
LOL :lol:

Just a lurker here, but even I know the air filter propensity of the Bluefront (tm) design. It has even inspired a design by me - it's not finished yet, but will be before the fall.

Looks great man, very original.

lm
Friend of SPCR
Posts: 1251
Joined: Wed Dec 17, 2003 6:14 am
Location: Finland

Post by lm » Tue May 08, 2007 11:38 am

It's bad for ergonomics to put the monitor on top of the computer, since the top of the picture area should be lower than eyelevel unless you want neck pain.

Bluefront
*Lifetime Patron*
Posts: 5316
Joined: Sat Jan 18, 2003 2:19 pm
Location: St Louis (county) Missouri USA

Post by Bluefront » Tue May 08, 2007 1:35 pm

I'm 6'5".......so sitting the monitor on a stand that is about 4" tall, still puts it below eye level, unless I raise the monitor on it's adjustable mount. There would be a few methods to put a filter into the fan setup, but not with either fan I showed. But it would be a tight fit, probably add to the noise level, and be a bear to get it working right. As it is, the air is sucked through the Xp-120. Of course there is no way to filter this method. I'm not sure what I'll do with this computer. But since the HD in my bedroom computer is failing, I might put it there. I really like this thing. Still waiting on the PICO.

Bluefront
*Lifetime Patron*
Posts: 5316
Joined: Sat Jan 18, 2003 2:19 pm
Location: St Louis (county) Missouri USA

Post by Bluefront » Sat May 12, 2007 3:48 pm

It's mostly finished now.....the 120w PICO is running this computer, using a 15A 12V external power supply. No problems so far. I added one support strut across the bottom. It supports the CPU cooler frame, strengthens the whole setup, and provides a stopper so the keyboard cannot slide in far enough to hit the cards or the fan assy.

At 28C ambient, the CPU idles at 33C (about 5v), and maxes about 52C at about 10V. It's quiet enough with that Yate Loon fan setup, to not really be noticeable except at max cpu usage (benchmarking). The last photo shows a 15" monitor sitting on the Rubbermaid, a small keyboard slides in about 3/4. All that's left is some bling.....an LCD indicator panel I'm now checking out.

Image

Image

Image

kogi
Posts: 155
Joined: Tue Apr 08, 2003 2:02 pm
Location: sydney.au

Post by kogi » Sat May 12, 2007 4:45 pm

Brilliant, now I want one!
What CPU are you using. Can the pico handle an e4300?

And I couldn't find model #48625 . Is it this one?
http://www.twinsupply.com/office/prodde ... d=ROL82411

kogi

Bluefront
*Lifetime Patron*
Posts: 5316
Joined: Sat Jan 18, 2003 2:19 pm
Location: St Louis (county) Missouri USA

Post by Bluefront » Sat May 12, 2007 5:35 pm

That's it ok.....I found a second at Walmart in Kirkwood Missouri for $15. That was the last one they had, although there was no indication they were not getting a new supply.

As I said a matx board is a perfect fit. The cross braces are on the right spots to mount the board using the stock mb holes. I glued on some wood strips, and attached the board with wood screws. Easy.....

That's a P4-2.4. Uses about 65W max, so no wonder a 5A psu was not enough. You'll have to figure out the current draw of your pieces......the 200w PICO model would give you some head-room. My last PICO project used a P4-2.8, an Nvidia 6200, a TV card, and a std optical drive in an Aria case, but that was with the 200W PICO.....same 15A power supply.

Here's a link to the mini-box[PICO] page describing/answering various power related questions.

Moogles
Posts: 315
Joined: Thu Mar 22, 2007 10:28 am

Post by Moogles » Mon May 14, 2007 3:00 am

Very well done!

Have you seen this Silverstone case? http://silverstonetek.com/products/ml02/ml02_photo.html

Looks like you built something of similar design for $15. :) Nice work.

Bluefront
*Lifetime Patron*
Posts: 5316
Joined: Sat Jan 18, 2003 2:19 pm
Location: St Louis (county) Missouri USA

Post by Bluefront » Mon May 14, 2007 3:57 am

I'll be damned....that Silverstone does look very similar. Looks like the MB requires a riser card to use the slots. Which means you lose some ports. And the internal PSU uses up quite a bit of space. I'd guess mine is vented better, and might run cooler. That case is much shorter, but needs the top fairly cleared to vent properly. I doubt you could set a monitor up there......and mine has space under it to slide in a keyboard. If I install the LCD panel I have, my Rubbermaid would really look the same. Hope they don't sue me.... :lol:

Bluefront
*Lifetime Patron*
Posts: 5316
Joined: Sat Jan 18, 2003 2:19 pm
Location: St Louis (county) Missouri USA

Post by Bluefront » Wed May 16, 2007 4:43 pm

Well I've come to a few conclusions about this computer and airflow.....notably I get the best results blowing the air upward into the XP-120. The problem is I have no clearance for a 25mm thick fan, and the available 15mm thick fans, are not powerful enough to return acceptable temperatures. I am unwilling to raise this computer much further than it is now. I added 1/2" foam feet to the bottom.....that's enough. Anyway....here is my latest cooler, an XP-120 combined with a 140mm 20mm thick Aerocool fan. This gives only 18mm clearance from the fan hub to the desktop. That is really too little clearance for maximum airflow, but it works great at normal usage. I'll play around with the setup before making any temperature charts.....but initial testing is fantastic. I have to figure out a way to run this fan below 5V.

Image

jhhoffma
Posts: 2131
Joined: Mon Apr 25, 2005 10:00 am
Location: Grand Rapids, MI

Post by jhhoffma » Thu May 17, 2007 6:25 am

Bluefront,

I love your designs and ideas. Been an admirer from day one, but I gotta take issue with your pics.

How about bumping up the resolution or lowering the compression a little on them? Sometimes when the pics are of internals, it's really hard to see what's going on in there.

I'm sure you have some bandwidth issues you're dealing with, but it'd really be beneficial to the community.

Won't someone think of the children!?!? :P

Bluefront
*Lifetime Patron*
Posts: 5316
Joined: Sat Jan 18, 2003 2:19 pm
Location: St Louis (county) Missouri USA

Post by Bluefront » Thu May 17, 2007 12:27 pm

I'm on a dial-up modem......can't get broadband. I try to keep these photos around 50k, so I can deal with them. I wish it could be different, but I'm stuck for now. If you want to see a more detailed photo of a particular part, point it out, and I'll try to upload it. I always keep the photos in these threads small, so we dial-up people can see things. Every time I try to view a photo of 200k or more around here, I grit my teeth, and do something else for a while. :cry:

qviri
Posts: 2465
Joined: Tue May 24, 2005 8:22 pm
Location: Berlin
Contact:

Post by qviri » Thu May 17, 2007 1:23 pm

Bluefront,

do you compress your files before or after applying the watermark? If the former, can you check what the file size is after compression, but before watermarking? Something in your photo production stream is not being very efficient.

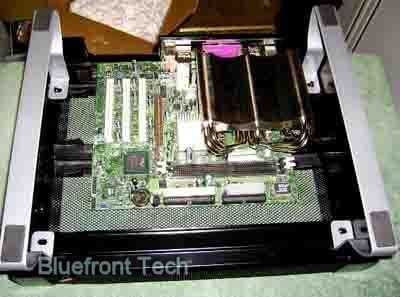
The last picture you posted in this thread has 110,000 pixels (400*275), and is 47 kilobytes. Take for example this picture (49 kilobytes), which has 198,790 pixels (386*515), and has much more detail at practically the same size.

I just tried compressing your picture and got it down to 15 kilobytes with no visible loss of quality (Paint Shop Pro, exporting to JPEG with compression set at 40% -- and it's as little as 25 kilobytes at 5%). I suspect your watermarking software is not able to save compressed JPEGs. If that's the case, try watermarking then compressing, rather than vice versa.


I feel for the dial-up situation BTW -- I used to know a family which lived 5 km outside a city, only 20 km from downtown Niagara Falls, and in 2005 couldn't get anything but dial-up either. Maybe someone connected them already, but I wouldn't be surprised if they were still dialing up.

jaganath
Posts: 5085
Joined: Tue Sep 20, 2005 6:55 am
Location: UK

Post by jaganath » Thu May 17, 2007 2:19 pm

I used to use this program to speed up my dial-up, maybe it might help BF.

Bluefront
*Lifetime Patron*
Posts: 5316
Joined: Sat Jan 18, 2003 2:19 pm
Location: St Louis (county) Missouri USA

Post by Bluefront » Thu May 17, 2007 3:46 pm

Here's the inside information.....I use several fairly cheap digital cameras, 5.0 mega-pixels. I have the resolution set medium. I use photoshop to adjust the picture size, and watermark professional. The watermark is applied lastly. My better pictures are taken outside, with a fill-in flash. And.....these little photo-projects of mine are not intended to be a "how-to". I expect that I give some people ideas of possible projects.....that's it. And with that intent, super-high resolution photos are un-necessary. If I had broadband, things might be different. I do what I can.......

Here are four more photos of the current HSF. I'm now using a Swiftech heatsink, not nearly as good as the XP-120, but 3/4" more shallow. This allows the fan to be dropped much further into the case. The results here....the temps dropped drastically for everything. I can't believe how much. With the current fan speed controller, I idle about 950rpms at 27C ambient, the CPU measuring about 31C. That fan practically covers the entire board, and the heatsink is only about the size of an 80mm fan. This means the whole board gets direct airflow from the fan......including the ram sticks, the NB, the PICO, and even the HD. Amazingly low temps. At maximum CPU usage, the CPU goes to about 51C, but everything else stays around 30C. At maximum the fan is doing about 1250rpms.....not too bad, audible for sure, but the way I use computers, this high temp and high rpm will be rare. I still might try another fairly short HSF setup....a Zalman 7700, modded with a Yate Loon. It's in use right now, so it might take a while. Never know...... :lol:

Image

Image

Image

Image

Post Reply