
The contest and the components
Earlier this month, ASUS Computer created a cont est called “ASUS Xtreme Designâ€
ASUS Xtreme Design contest - Stage 2 - Zads "HTGPC"
Moderators: NeilBlanchard, Ralf Hutter, sthayashi, Lawrence Lee
ASUS Xtreme Design contest - Stage 2 - Zads "HTGPC"
Last edited by zads on Thu Dec 03, 2009 12:37 pm, edited 1 time in total.
-
hybrid2d4x4
- Posts: 310
- Joined: Mon Sep 03, 2007 1:45 pm
- Location: Edmonton, Alberta, Canada
Interesting concept. Is the wall of fans adjacent to the rad blowing the hot air out of the case or in? From the picture it looks like they're blowing in... I hope this doesn't compromise your temps (as I think Frenchie was hinting at). It's very cool of Asus to have such a contest, how did you hear about it?
Seeing as how its just a Core i7-860, and GTX 260 (55nm) I think I will have very good temps actually.frenchie wrote:Really nice. I'm curious about temps though...
4x Yate Loon Low speed 120mm fans in Push-pull configuration across the Swiftech radiator should be sufficient to keep it chilly.. I really hope!
Yes, there are 4x 120mm low speed fans in push-pull configuration across a 240mm wide radiator, blowing into the case, which should be sufficient to supply the radiator enough air, while still providing some positive pressure for passive heatsink components on the motherboard.. I made an educated guess herehybrid2d4x4 wrote:Interesting concept. Is the wall of fans adjacent to the rad blowing the hot air out of the case or in? From the picture it looks like they're blowing in... I hope this doesn't compromise your temps (as I think Frenchie was hinting at). It's very cool of Asus to have such a contest, how did you hear about it?
I found out through Asus' facebook page, come become a fan..
they said they will have more contests in the future too!!
ASUS Official Facebook page:
http://www.facebook.com/ASUSOfficialPage
ASUS Xtreme Design contest Facebook page, come check out the other people's build logs as well!!:
http://www.facebook.com/#/event.php?eid ... 08&index=1
-
hybrid2d4x4
- Posts: 310
- Joined: Mon Sep 03, 2007 1:45 pm
- Location: Edmonton, Alberta, Canada
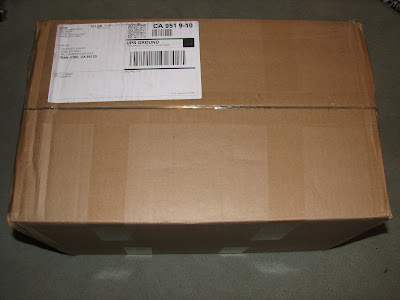
UPDATE: 12/02/2009; Another primary sponsor!
Got this package in the mail last night:

I am proud to announce that Swiftech "Manufacturer of the world's best active coolers",
has signed on as a primary sponsor for my project!
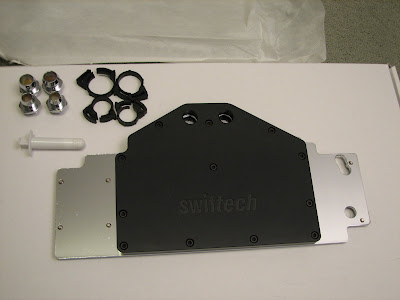
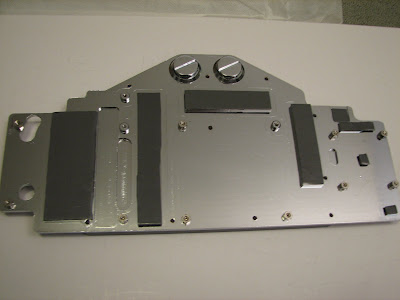
Here are some more parts they have provided, starting with the ultimate in performance CPU water blocks on the market today!!
Unveiled only two months ago, the Swiftech Apogee XT has set a new standard in water cooling CPU block performance. [/B]
(see this independent review for more information)
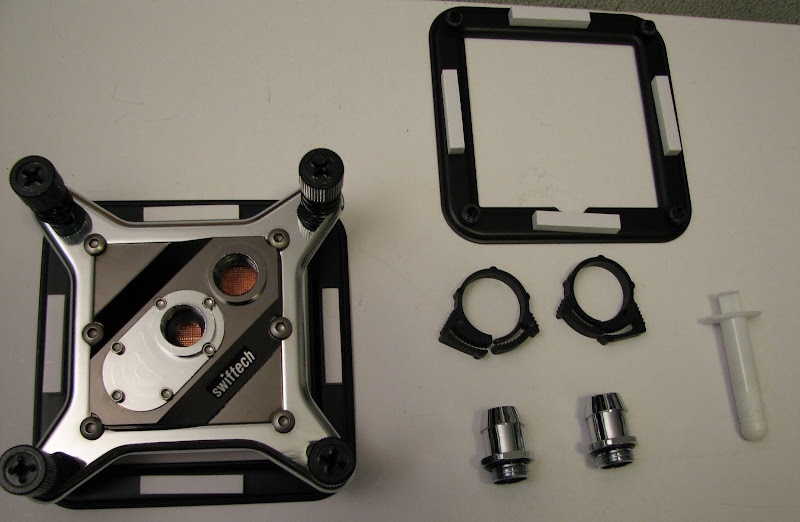
Comes with 2 1/2" ID chrome barb fittings, reusable hose clamps, multiple CPU brackets (LGA 1156, LGA 1366), an unlabeled TIM (heatsink thermal grease).
It also has a nice "X" shape to it, for Xtreme design competition build
And damn.. it just looks absolutely dead sexy all by itself!!! [H]
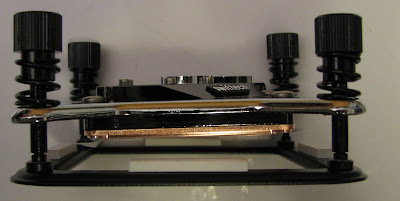
Uses spring loaded screws and a stiff stamped metal back plate.
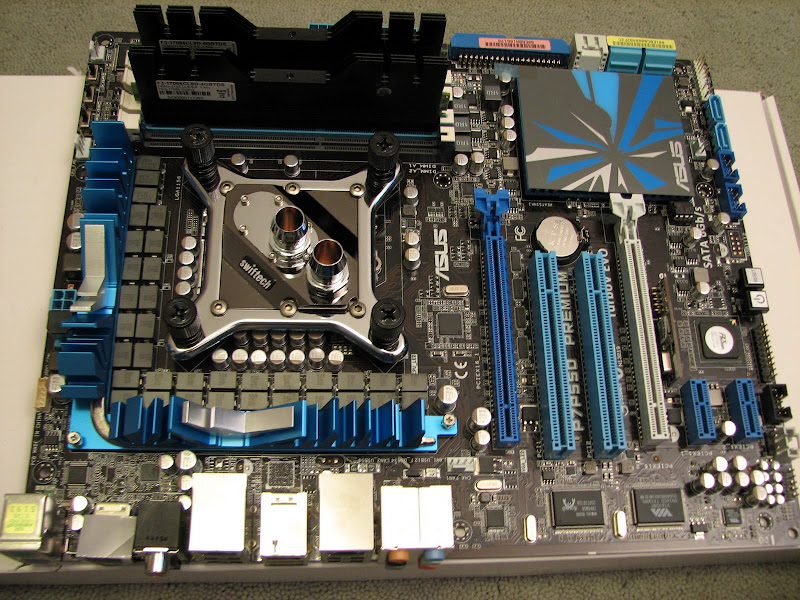
The black, silver, and pewter color of the block goes well with most any system/motherboard color scheme, very classy.
No clearance issues anywhere.
Now to put some cold water on that power hungry and hot GT200b GPU in the ASUS GTX260 GL+ (core 216),
we have the Komodo series GTX275-P897 full cover GPU waterblock.
Since the GTX260 (55nm "Core 216") often shares the same PCB as the GTX275,
This block will fit the GTX260 55nm, assuming the video card manufacturer uses the NVIDIA reference PCB design for GTX275,
labeled "P897" on the back (and not one of the video card company's own PCB designs).

More black and chrome sexiness!
Comes with the 1/2" and 3/8" chrome plated barb fittings (two of each size!), reusable hose clamps, the same unlabeled TIM as the CPU block.
Preapplied thermal tape pads (dark gray strips) for the critical components, a nice touch..
Some other GPU blocks require you to cut and place your own thermal pads and stick them on the block manually.
Swiftech has done this already for you.
ASUS has used a slightly modified version of the NVIDIA reference PCB on the ASUS GTX260 GL+, so I will have to use a mill to take some material out for component clearances.
You can bet I'm gonna be measuring 20x for every little mill cut :p:
..I can detail this later if anyone has interest,
basically its the caps around the voltage regulators on the right side of the PCB and the caps on the upper left of the PCB.
Next up, the high performance MCP350 12VDC pump.
Since I am working in a limited space, I need a low profile/small footprint, high performance pump.
The MCP350 will provide high pump pressure to maximize liquid flow through my tubing and cooling blocks, while keeping a very low profile and minimal noise.
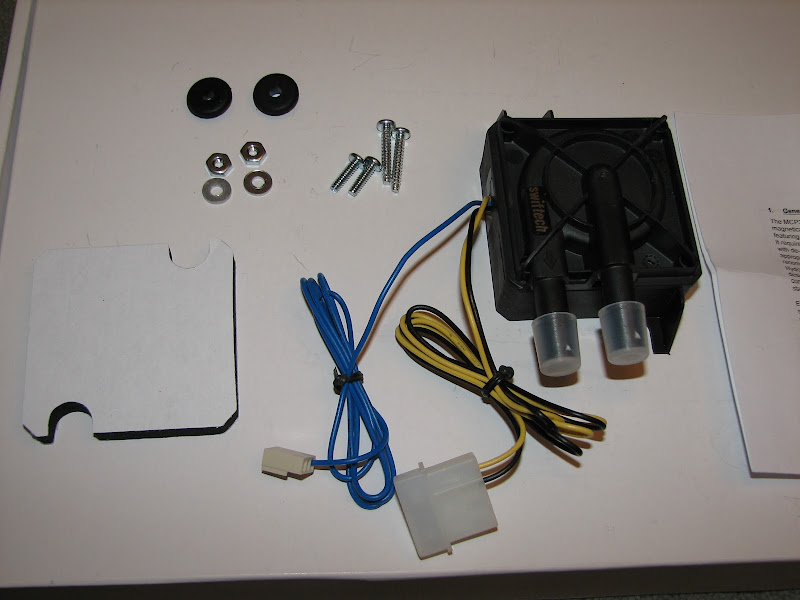
The pump comes with a molex connector for power from your power supply,
as well as a 3-pin fan header (with the single blue wire) to connect to your motherboard or fan controller.
This allows your to monitor your pump to make sure it is functioning properly,
or sound an alert/alarm if it is not spinning.
Swiftech also has a higher performance version, the MCP355.
Next we have the MCR220 QP"Quiet Power" Radiator.
4x 120mm fan locations, nice built in plenum for better fan performance.
Bang for your buck, there isn't much better than this series of radiators.
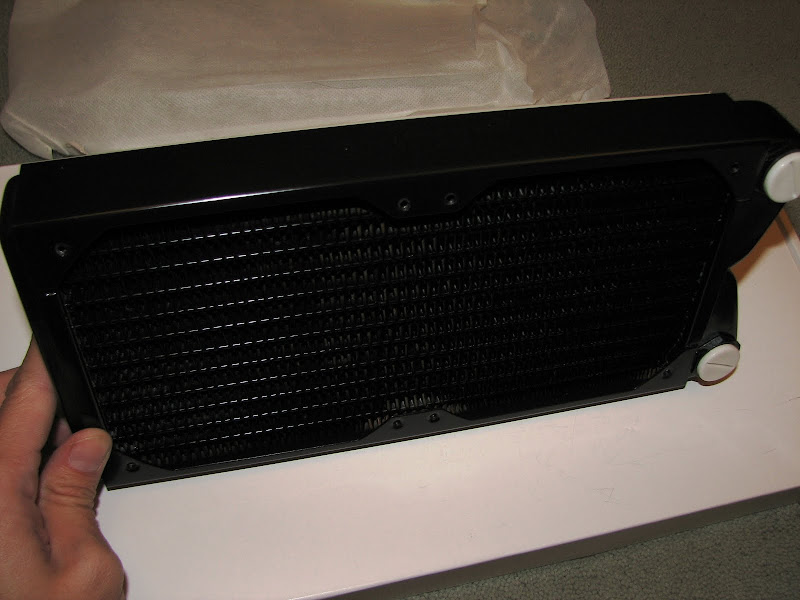
They also have a stackable version and a integrated reservoir version.
Last but not least, we have the MCRES Micro Rev2 micro reservoir.
Again, since size being a big issue for my build, this fits my build perfectly. Thin small footprint can be mounted in various fashions, with 3 ports of the bottom to allow for various inlet/outlet configurations, and another port on the top for a fill/vent to the reservoir.
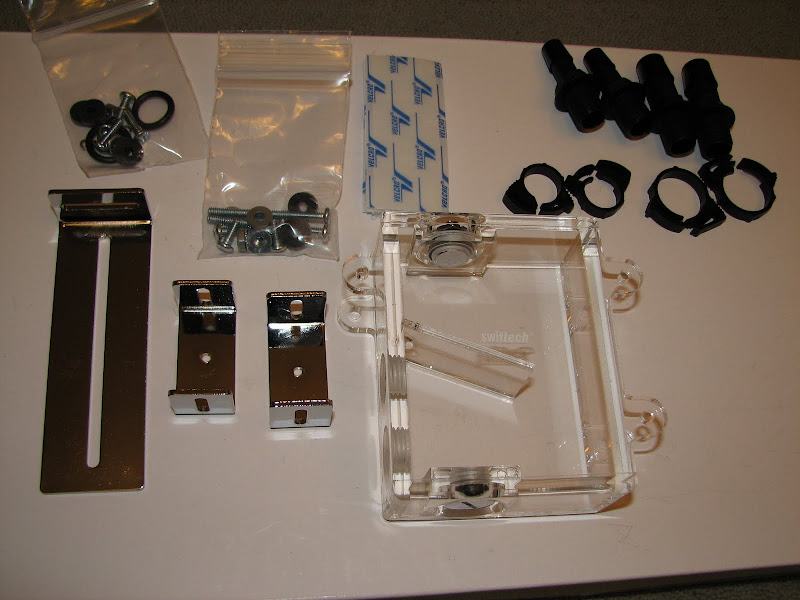
Comes with multiple mounting brackets and screws for mounting however you want it (and sticky back velcro for temporary mounting options), 4 black plastic barb fittings (3/8" and 1/2" ID tubing), reusable hose clamps, even includes spare o-rings.

So that's it for the shiny parts pictures, time for the real build!
Many thanks to Gabe and Michelle at Swiftech, they are a quality company with great customer service.
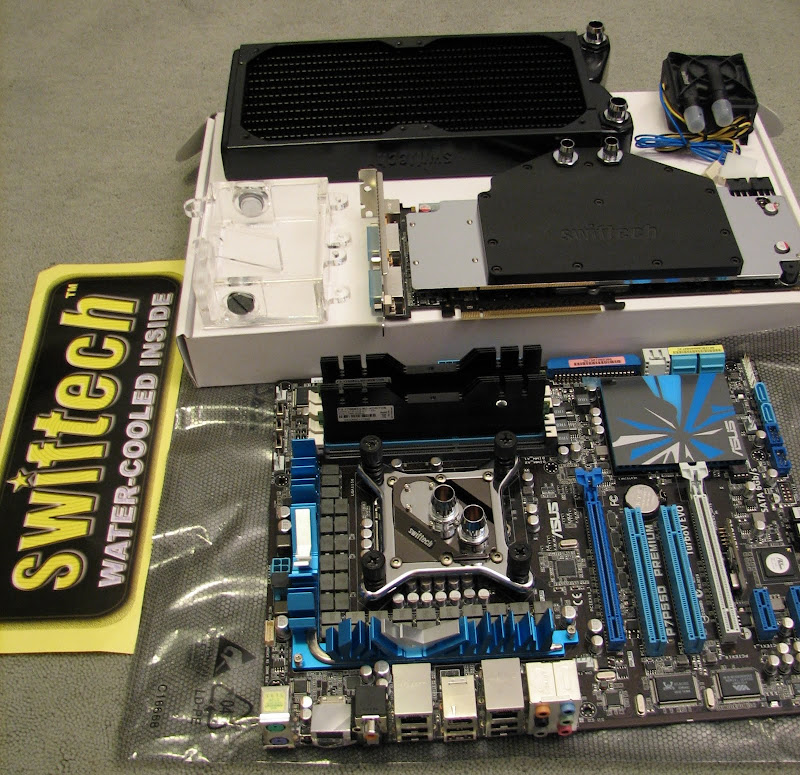
Got this package in the mail last night:
I am proud to announce that Swiftech "Manufacturer of the world's best active coolers",
has signed on as a primary sponsor for my project!
Here are some more parts they have provided, starting with the ultimate in performance CPU water blocks on the market today!!
Unveiled only two months ago, the Swiftech Apogee XT has set a new standard in water cooling CPU block performance. [/B]
(see this independent review for more information)
Comes with 2 1/2" ID chrome barb fittings, reusable hose clamps, multiple CPU brackets (LGA 1156, LGA 1366), an unlabeled TIM (heatsink thermal grease).
It also has a nice "X" shape to it, for Xtreme design competition build
And damn.. it just looks absolutely dead sexy all by itself!!! [H]
Uses spring loaded screws and a stiff stamped metal back plate.
The black, silver, and pewter color of the block goes well with most any system/motherboard color scheme, very classy.
No clearance issues anywhere.
Now to put some cold water on that power hungry and hot GT200b GPU in the ASUS GTX260 GL+ (core 216),
we have the Komodo series GTX275-P897 full cover GPU waterblock.
Since the GTX260 (55nm "Core 216") often shares the same PCB as the GTX275,
This block will fit the GTX260 55nm, assuming the video card manufacturer uses the NVIDIA reference PCB design for GTX275,
labeled "P897" on the back (and not one of the video card company's own PCB designs).
More black and chrome sexiness!
Comes with the 1/2" and 3/8" chrome plated barb fittings (two of each size!), reusable hose clamps, the same unlabeled TIM as the CPU block.
Preapplied thermal tape pads (dark gray strips) for the critical components, a nice touch..
Some other GPU blocks require you to cut and place your own thermal pads and stick them on the block manually.
Swiftech has done this already for you.
ASUS has used a slightly modified version of the NVIDIA reference PCB on the ASUS GTX260 GL+, so I will have to use a mill to take some material out for component clearances.
You can bet I'm gonna be measuring 20x for every little mill cut :p:
..I can detail this later if anyone has interest,
basically its the caps around the voltage regulators on the right side of the PCB and the caps on the upper left of the PCB.
Next up, the high performance MCP350 12VDC pump.
Since I am working in a limited space, I need a low profile/small footprint, high performance pump.
The MCP350 will provide high pump pressure to maximize liquid flow through my tubing and cooling blocks, while keeping a very low profile and minimal noise.
The pump comes with a molex connector for power from your power supply,
as well as a 3-pin fan header (with the single blue wire) to connect to your motherboard or fan controller.
This allows your to monitor your pump to make sure it is functioning properly,
or sound an alert/alarm if it is not spinning.
Swiftech also has a higher performance version, the MCP355.
Next we have the MCR220 QP"Quiet Power" Radiator.
4x 120mm fan locations, nice built in plenum for better fan performance.
Bang for your buck, there isn't much better than this series of radiators.
They also have a stackable version and a integrated reservoir version.
Last but not least, we have the MCRES Micro Rev2 micro reservoir.
Again, since size being a big issue for my build, this fits my build perfectly. Thin small footprint can be mounted in various fashions, with 3 ports of the bottom to allow for various inlet/outlet configurations, and another port on the top for a fill/vent to the reservoir.
Comes with multiple mounting brackets and screws for mounting however you want it (and sticky back velcro for temporary mounting options), 4 black plastic barb fittings (3/8" and 1/2" ID tubing), reusable hose clamps, even includes spare o-rings.
So that's it for the shiny parts pictures, time for the real build!
Many thanks to Gabe and Michelle at Swiftech, they are a quality company with great customer service.
Last edited by zads on Tue Dec 08, 2009 11:37 pm, edited 3 times in total.
Yeah sorry I guess the BBCode is different on this forum.idale wrote:Good news on picking up a sponsor for the watercooling (especially with finding a block for the GPU).
Edited for clarity.
RoGuE wrote:did you import all the computer components into solidworks? if so, how did you obtain them. I see a ton of artwork on the back of the GPU's..so it seemed strange to me that you drew in all those traces yourself...
So cool u got sposord...im jealous lol
Yeah, Swiftech is great in my book.sfanatics wrote:wow your rig is coming along nicely! i just picked up a corsair h50watercooler. does the job but yours is slick
At good retail prices, all the Swiftech components are about $315 total.
It's a big jump in price from a "boxed" water cooler system,
but Swiftech definitely gives the best bang for your buck when it comes to custom water cooling components.
It should give me some nice and cool system temperatures, as well.
I had some other well known watercooling companies offer sponsorship,
but in the end what made me choose Swiftech was;
their enthusiasm for my project,
they have the highest performance CPU waterblock on the market,
and an excellent high-flow GPU full-cover waterblock design.
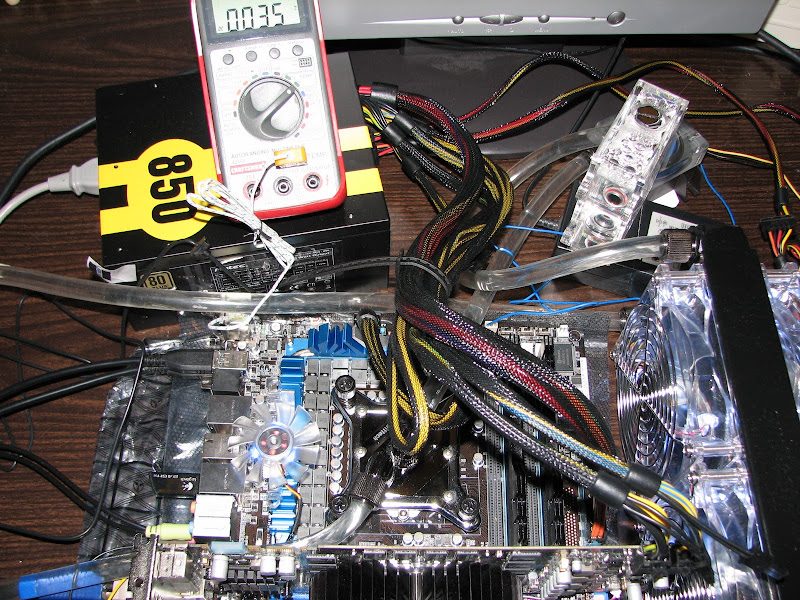
Update: CPU OC results!
So here's my bench testing setup.
Since my last update I have added: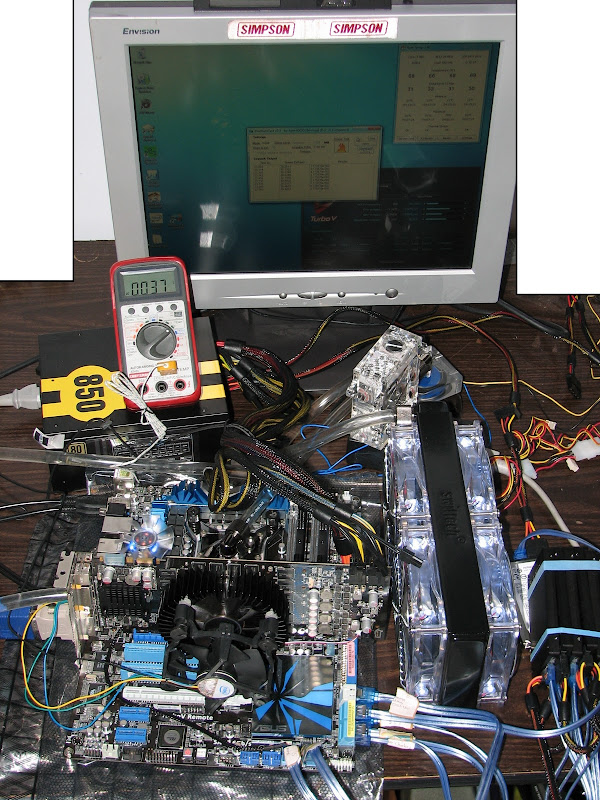
The ASUS P7P55D Premium motherboard has 32 phases of voltage regulator circuitry (VRMs) power to the CPU
(the more phases, the more stable the overclock voltage will be).
ASUS also includes a feature on this motherboard called T.Probe,
which monitors the temperature of each VRM, and then adjusts the VRM loading to balance out their temperatures.
This ensures that no single VRM will fail prematurely to the other ones, very nice! (picture taken from another source)

I found that on the high power overclocking passes, the VRM heatpipe heatsink
(the blue heatpipe heatsink on the top and left o the CPU),
was passing 85 deg C...
this temperature is still within safe levels, but I decided to just stick a fan on there to keep the temps down anyway.
I had the tiny blue LED fan (pretty quiet) off the G.Skill memory kit that I wasn't using, so I just stuck it on the VRM heatsink, just to the left of the CPU.
+1 bling agility skill.
Result: 37 deg C max.
I started overclocking by using the ASUS Hybrid Design features.
The ASUS P7P55D Premium can team up with the ASUS TurboV EVO software, which has a couple great features on it.
You can adjust all of these settings from Windows, allowing you to boot up with a known-stable BIOS configuration setting,
and then overclock and test for stability while in Windows.
Gone are the days of changing settings in BIOS, rebooting, waiting for OS to boot up (hoping it doesn't crash), testing, restarting, then repeat cycle all over again.
Here is a screenshot of the TurboV EVO software (screenshot taken from PureOC):
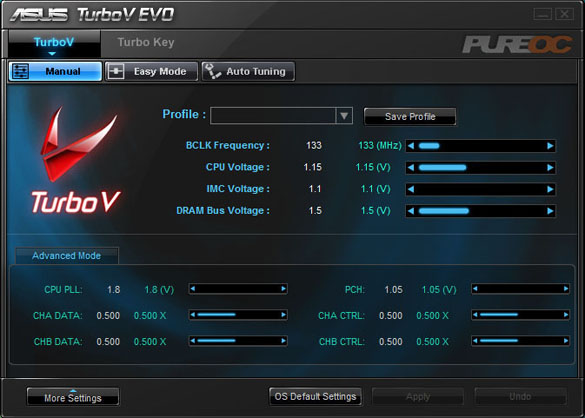
Adjustable parameters:
Bclk (base clock), vCPU (CPU voltage), vIMC (integrated memory controller voltage), vDRAM (DRAM voltage);
CPU PLL (CPU clock generator voltage), PCH (peripheral controller hub voltage), CH A/B DATA/CTRL thresholds (advanced data settings).
You can change these settings quite drastically, which is quite empowering.
200 Mhz Bclk is only about half of the maximum setting on this software (!)
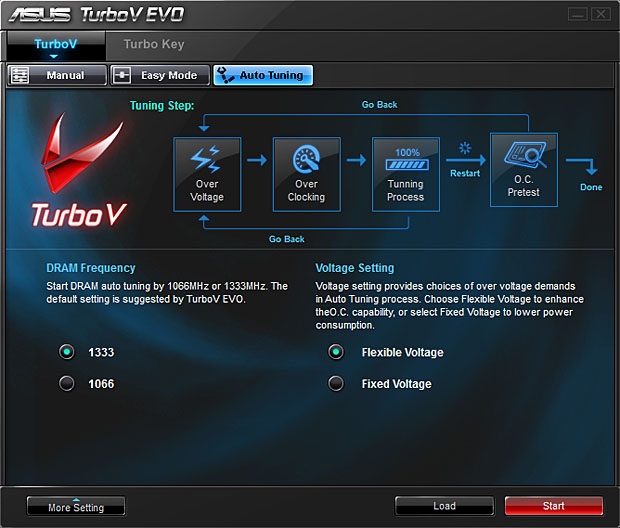
The ASUS TurboV EVO software also has an AutoTune feature.
This automatically raises your Bclk incrementally,
and then tests your system for stability after each increase.
Very cool feature to obtain a quick and easy overclock setting,
especially if you're new to overclocking and intimidated by all the settings.
I also found that the settings of "Auto" in BIOS are much better on this ASUS board than most.
For instance, it would automatically bump the CPU voltage in response to overclock changes I made, settling in around 1.36 Vcore.
So the results of my CPU overclocking are:
(I consider IntelBurnTest a great program to test CPU stability, much faster to find errors than Prime95)
Using ASUS BIOS OC Tuner feature (takes 20 seconds..!):
3.59 Ghz! (19 x 189 Bclk)
@ 1.35 vCore (set to AUTO), 1.38 vIMC (set to AUTO).
Hyperthreading and Turbo boost ON,
All power saving features ON.
Maximum CPU speed:
4.4 Ghz (22 x 200 Bclk)
@ 1.45 vCore (manual, Fixed), 1.38 vIMC (manual)
Hyperthreading and Turbo boost OFF,
All power saving features OFF.
Temperatures maxed out around 88-89 deg C (Thanks again to my awesome watercooling sponsor SWIFTECH!!!)
Optimum CPU setting:
4.0 Ghz (20 x 200 Bclk)
@ 1.375 vCore (manual, Fixed), 1.38 vIMC (manual)
Hyperthreading ON and Turbo boost OFF,
All power saving features ON.
Temperatures maxed out around 72-73 deg C (Thanks again to my awesome watercooling sponsor SWIFTECH!!!)
Note: my personal 'optimum' is defined by:
-Need to have power saving features on (efficiency matters to me)
-Need a large buffer to Tj.max, since I eventually will cool a GPU in this loop as well
Since my last update I have added:
- 6 x 128GB SSDs in RAID-0 using the onboard 6x SATA 3.0Gbps ports (bottom right corner.. like the rubber bands? lol
 )
) - 1x EK V2 acrylic pump top to the MCP350 to provide better pump performance (and some acrylic 'bling'),
- 4x 120mm Yate Loon D12SL-12 White LED fans from PetrasTechShop.com,
- 3/8" ID 1/2" OD Tygon tubing,
- Koolance Compression fittings.
 )
)The ASUS P7P55D Premium motherboard has 32 phases of voltage regulator circuitry (VRMs) power to the CPU
(the more phases, the more stable the overclock voltage will be).
ASUS also includes a feature on this motherboard called T.Probe,
which monitors the temperature of each VRM, and then adjusts the VRM loading to balance out their temperatures.
This ensures that no single VRM will fail prematurely to the other ones, very nice! (picture taken from another source)
I found that on the high power overclocking passes, the VRM heatpipe heatsink
(the blue heatpipe heatsink on the top and left o the CPU),
was passing 85 deg C...
this temperature is still within safe levels, but I decided to just stick a fan on there to keep the temps down anyway.
I had the tiny blue LED fan (pretty quiet) off the G.Skill memory kit that I wasn't using, so I just stuck it on the VRM heatsink, just to the left of the CPU.
+1 bling agility skill.
Result: 37 deg C max.
I started overclocking by using the ASUS Hybrid Design features.
The ASUS P7P55D Premium can team up with the ASUS TurboV EVO software, which has a couple great features on it.
You can adjust all of these settings from Windows, allowing you to boot up with a known-stable BIOS configuration setting,
and then overclock and test for stability while in Windows.
Gone are the days of changing settings in BIOS, rebooting, waiting for OS to boot up (hoping it doesn't crash), testing, restarting, then repeat cycle all over again.
Here is a screenshot of the TurboV EVO software (screenshot taken from PureOC):
Adjustable parameters:
Bclk (base clock), vCPU (CPU voltage), vIMC (integrated memory controller voltage), vDRAM (DRAM voltage);
CPU PLL (CPU clock generator voltage), PCH (peripheral controller hub voltage), CH A/B DATA/CTRL thresholds (advanced data settings).
You can change these settings quite drastically, which is quite empowering.
200 Mhz Bclk is only about half of the maximum setting on this software (!)
The ASUS TurboV EVO software also has an AutoTune feature.
This automatically raises your Bclk incrementally,
and then tests your system for stability after each increase.
Very cool feature to obtain a quick and easy overclock setting,
especially if you're new to overclocking and intimidated by all the settings.
I also found that the settings of "Auto" in BIOS are much better on this ASUS board than most.
For instance, it would automatically bump the CPU voltage in response to overclock changes I made, settling in around 1.36 Vcore.
So the results of my CPU overclocking are:
(I consider IntelBurnTest a great program to test CPU stability, much faster to find errors than Prime95)
Using ASUS BIOS OC Tuner feature (takes 20 seconds..!):
3.59 Ghz! (19 x 189 Bclk)
@ 1.35 vCore (set to AUTO), 1.38 vIMC (set to AUTO).
Hyperthreading and Turbo boost ON,
All power saving features ON.
Maximum CPU speed:
4.4 Ghz (22 x 200 Bclk)
@ 1.45 vCore (manual, Fixed), 1.38 vIMC (manual)
Hyperthreading and Turbo boost OFF,
All power saving features OFF.
Temperatures maxed out around 88-89 deg C (Thanks again to my awesome watercooling sponsor SWIFTECH!!!)
Optimum CPU setting:
4.0 Ghz (20 x 200 Bclk)
@ 1.375 vCore (manual, Fixed), 1.38 vIMC (manual)
Hyperthreading ON and Turbo boost OFF,
All power saving features ON.
Temperatures maxed out around 72-73 deg C (Thanks again to my awesome watercooling sponsor SWIFTECH!!!)
Note: my personal 'optimum' is defined by:
-Need to have power saving features on (efficiency matters to me)
-Need a large buffer to Tj.max, since I eventually will cool a GPU in this loop as well
ASUS P7P55D Premium surpasses 650 MB/sec disk read speeds!
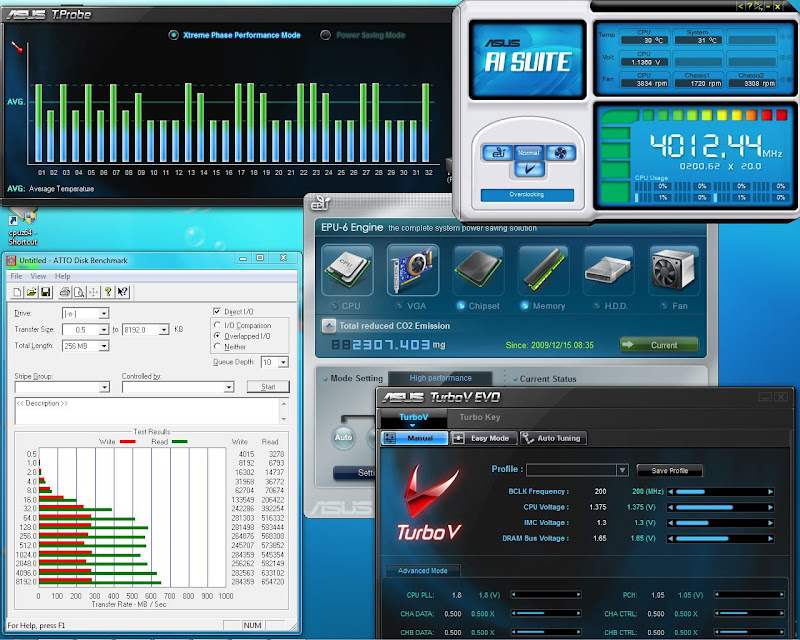
Thanks to the exclusive ASUS P7P55D Premium motherboard's onboard 6Gbps controller and an onboard RAID setup,
the World's first SATA 6Gb/s motherboard,
my Xtreme Design system has broken through 650 MB/sec read speeds, as measured in ATTO Disk Benchmark.
Note that this is achieved without use of external RAID controllers, only the onboard controller.
[ASUS Hybrid Processor CPU @ 4Ghz]+[ASUS Hybrid Phase power]
Thanks to the exclusive ASUS Hybrid Processor technology,
I was able to overclock the system to a very stable and strong overclock @ 4.0 GHz,
while keeping my system very cool under load and at idle.
The ASUS Hybrid Phase technology keeps the power consumption down at idle,
and provides a very stable vCore for the CPU voltage level,
resulting in an awesomely stable overclock at lower voltage than required on other boards.
The ASUS EPU6 Software undervolts the CPU and reduces its speed automatically at idle,
reducing idle temperatures and power consumption even more than any other solution!
This screenshot shows the system running full tilt,
with the system running CPU @ 4Ghz, GPU @ 750Mhz,
stressed processor and GPU with Prime95 (8 threads, hyperthreading enabled),
and Furmark for GPU stress.
23 deg C ambient temperature.
After 45 minutes:

CPU stays solid at a safe 80 deg C,
while the GPU stays at a relatively chilly 54 deg C.
Thanks to ASUS and my water cooling sponsor SWIFTECH,
for their absolutely outstanding and efficient products!
Here is another screenshot of temperatures, after idling for 30 mintues or so:
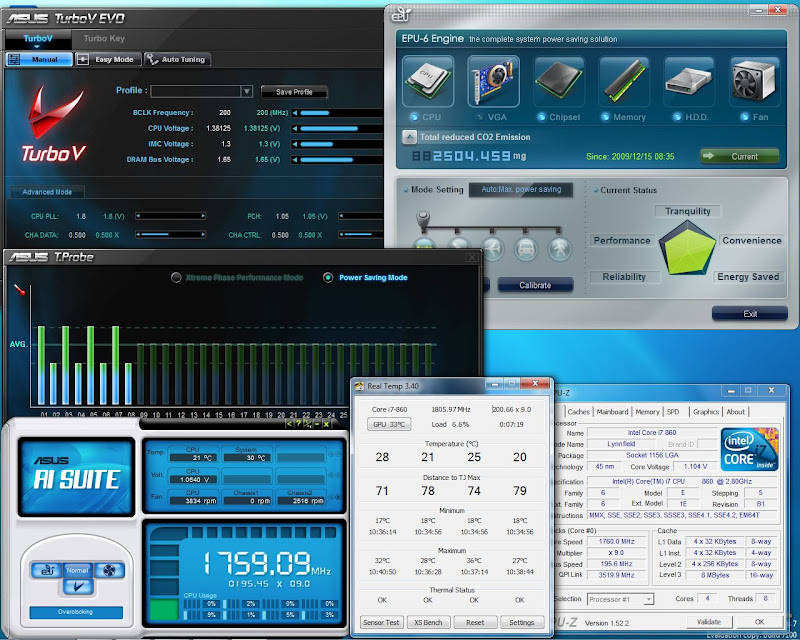
GPU is around 33 deg C, and the CPU cores are at average 23.5 deg C (!!!!)
It's astounding what the great SWIFTECH watercooling components,
combined with ASUS Hybrid Phase and ASUS EPU-6 hardware/software,
will do to cut the idle power consumption and idle temperatures.
Again, I can say enough:
Thanks to ASUS and my water cooling sponsor SWIFTECH,
for their absolutely outstanding and efficient products!
I was able to overclock the system to a very stable and strong overclock @ 4.0 GHz,
while keeping my system very cool under load and at idle.
The ASUS Hybrid Phase technology keeps the power consumption down at idle,
and provides a very stable vCore for the CPU voltage level,
resulting in an awesomely stable overclock at lower voltage than required on other boards.
The ASUS EPU6 Software undervolts the CPU and reduces its speed automatically at idle,
reducing idle temperatures and power consumption even more than any other solution!
This screenshot shows the system running full tilt,
with the system running CPU @ 4Ghz, GPU @ 750Mhz,
stressed processor and GPU with Prime95 (8 threads, hyperthreading enabled),
and Furmark for GPU stress.
23 deg C ambient temperature.
After 45 minutes:
CPU stays solid at a safe 80 deg C,
while the GPU stays at a relatively chilly 54 deg C.
Thanks to ASUS and my water cooling sponsor SWIFTECH,
for their absolutely outstanding and efficient products!
Here is another screenshot of temperatures, after idling for 30 mintues or so:
GPU is around 33 deg C, and the CPU cores are at average 23.5 deg C (!!!!)
It's astounding what the great SWIFTECH watercooling components,
combined with ASUS Hybrid Phase and ASUS EPU-6 hardware/software,
will do to cut the idle power consumption and idle temperatures.
Again, I can say enough:
Thanks to ASUS and my water cooling sponsor SWIFTECH,
for their absolutely outstanding and efficient products!
After a last minute push, it is finished!
I will call it: "White dwarf"
A star that has blown off its outer excess mass, leaving only a very dense white-blue colored core.
Likewise, my case design is devoid of all the bulk of regular computer cases,
only leaving behind the dense powerful components packaged into a small volume,
but with sufficient cooling to prevent it from going "supernova".
Quiet white LED fans gently let its presence be known.
I didn't have time before the deadline to apply some vinyl or paint as I would have liked,
but I did get the case finished to showcase my design concept and all of the components.
If I make it to the next stage, I will definitely add the vinyl for my primary sponsors.
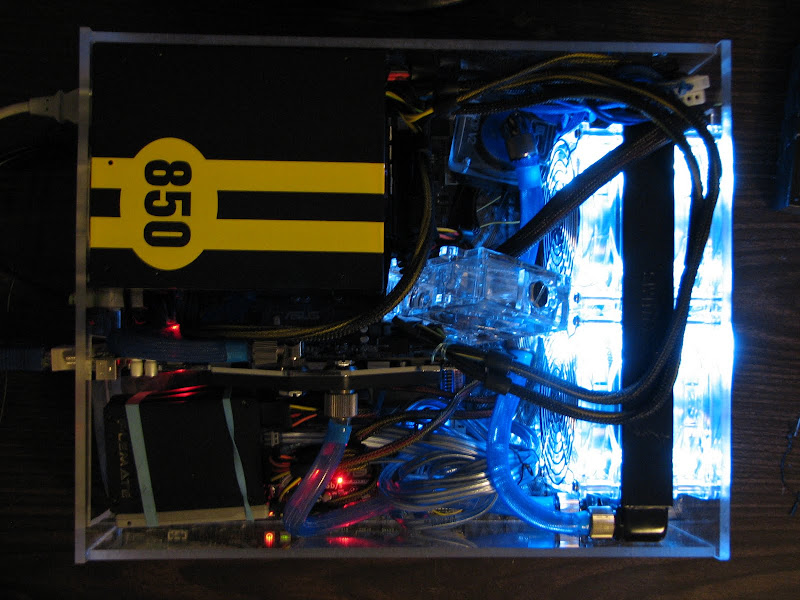
Here is the case as it sits under the HDTV now,
the front fans are 120mm fans, so you can see how small of a profile this computer is.
Remember this system crams in a:
ASUS P7P55 Premium ATX motherboard;
ASUS GTX 260 GL+ video card (~11" long);
Antec Quattro 850W ATX power supply;
Swiftech complete watercooling system
(XT CPU block, Komodo GPU Full cover block, MCR220 240mm Radiator with 4x 120mm fans in push-pull configuration, MCP350 pump with EK acrylic top, and MCRES reservoir),
8x 128GB 2.5" SSD drives (one sponsored from Samsung):
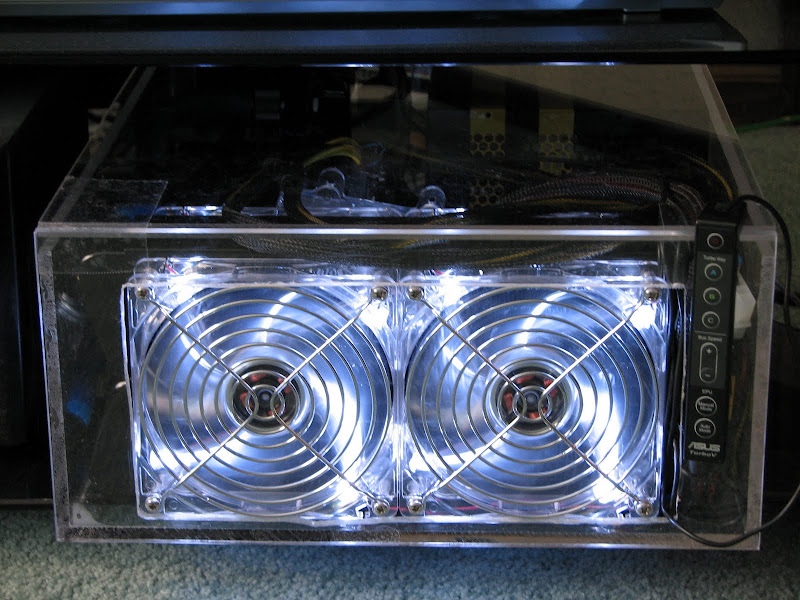
No need for any external buttons!-
The ASUS TurboV Remote hanging on the upper right corner of the case can:
Power on the computer,
Choose one of three user-selectable overclocking presets (or underclocking for power savings),
Adjust Bclk (bus speed/base clock frequency),
and choose EPU mode (for power savings or maximum power for overclock)
3/4 view sitting on my desk/test area:
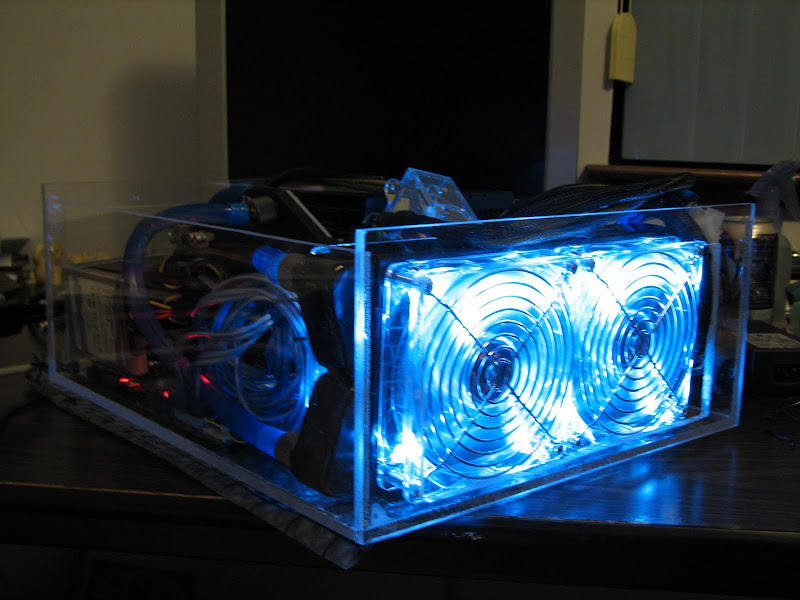
I'm not sure why the LED fans turned out Blue in this picture (maybe white balance?),
they are actually 120mm white LED fans..
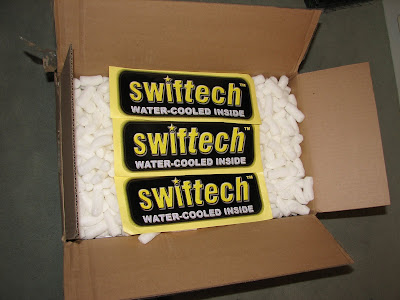
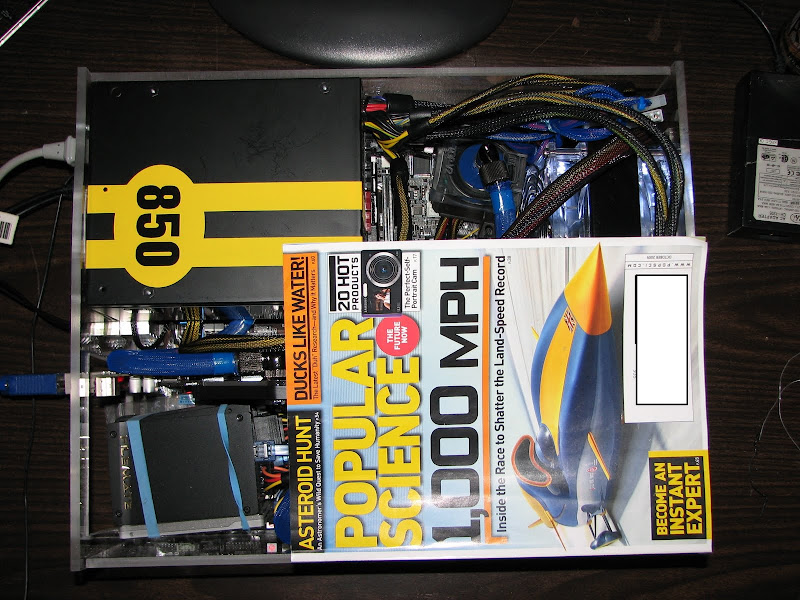
Top view of the packaging of the components:
Top view of the relative size/scale of the case,
with your typical size magazine on top of the case-
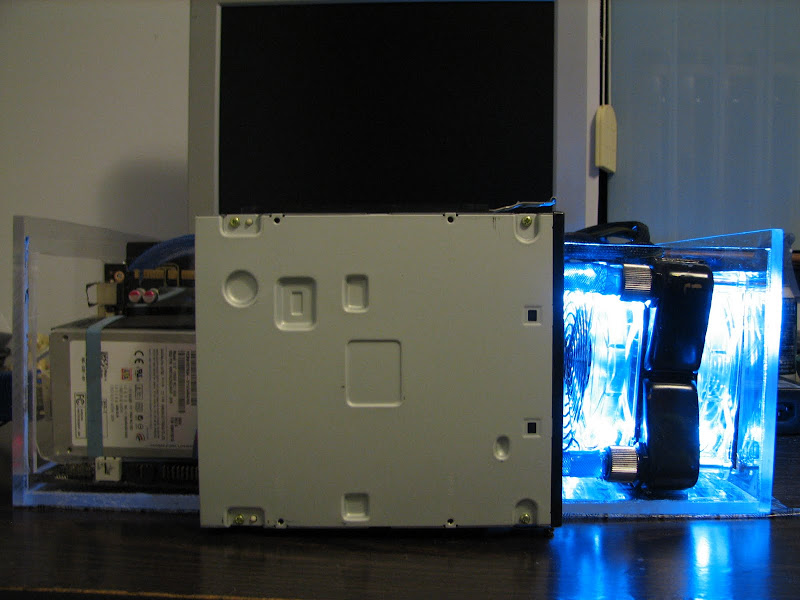
Side view of the relative size/scale of the case,
with your typical 5.25" Bay DVD-ROM drive in front of the case-
This picture shows how tight the actual packaging is in some places,
here is a shot of (left to right)
MCP350 water cooling pump,
the G.Skill DDR3-2133 memory & sockets,
850W PSU,
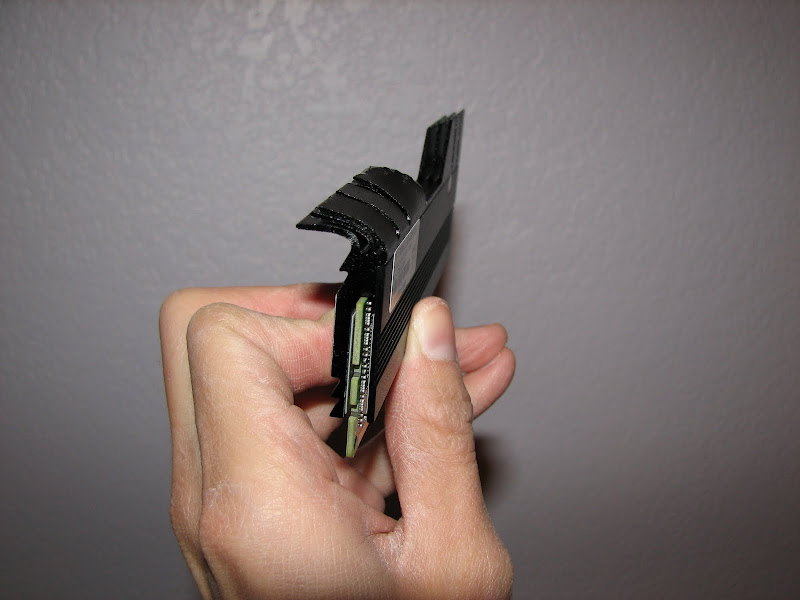
ASUS Blue and Chrome CPU VRM heatsinks,
and the G.Skill 40mm memory kit LED fan that I moved to be on top of the VRM heatsinks to keep them cool.
The tube going from left to right feeds directly into the Swiftech Apogee XT CPU waterblock.
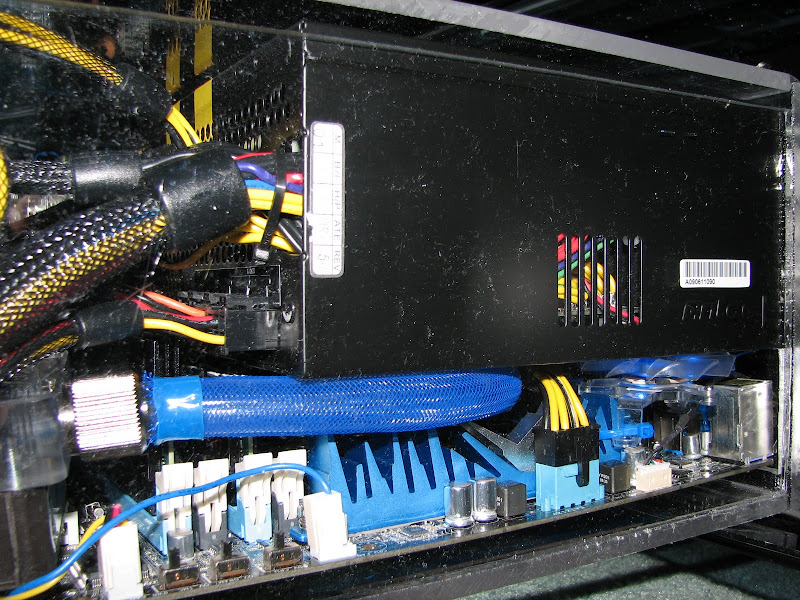
I'm actually kind of disappointed that you can't see the Swiftech Apogee XT block, that thing is dead sexy looking.
But at least you can still see the nice blue and chrome ASUS VRM heatsinks on the P7P55D Premium motherboard.
The PSU fits so tight on there, it actually sits on top of the 90 degree compression fittings coming out of the CPU water block.
Its a bit hard to see in the previous picture, but look where the modular cables come out, and look at the G.Skill heatsinks.
A bit of interference there, since the G.Skill heatsinks are kind of tall...
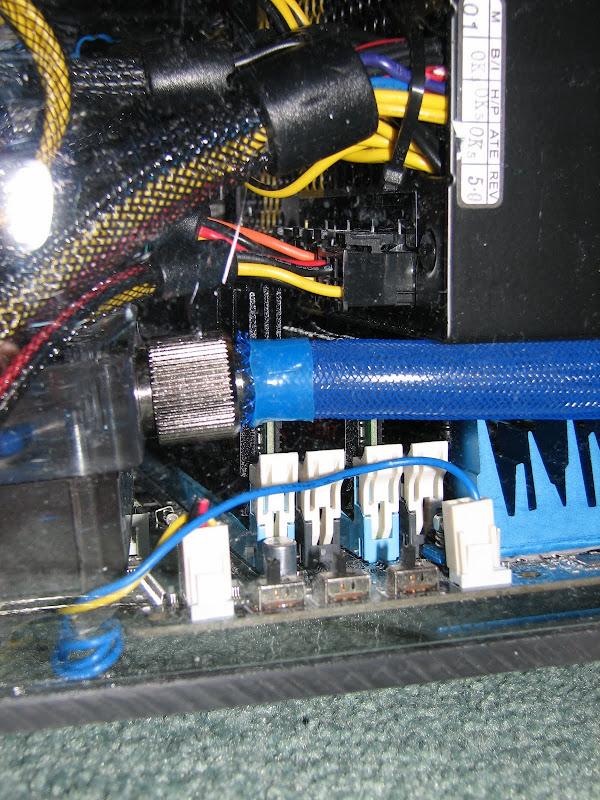
So yeah, had to do some "modifications" to be able to use some of those PSU modular connectors.
It fits as shown...
but I actually ended up just cutting those extra fins off, although I don't have a picture of that.
Some pictures of the acrylic case during fabrication,
here is gluing the sides onto the front faceplate/radiator intake fan area:
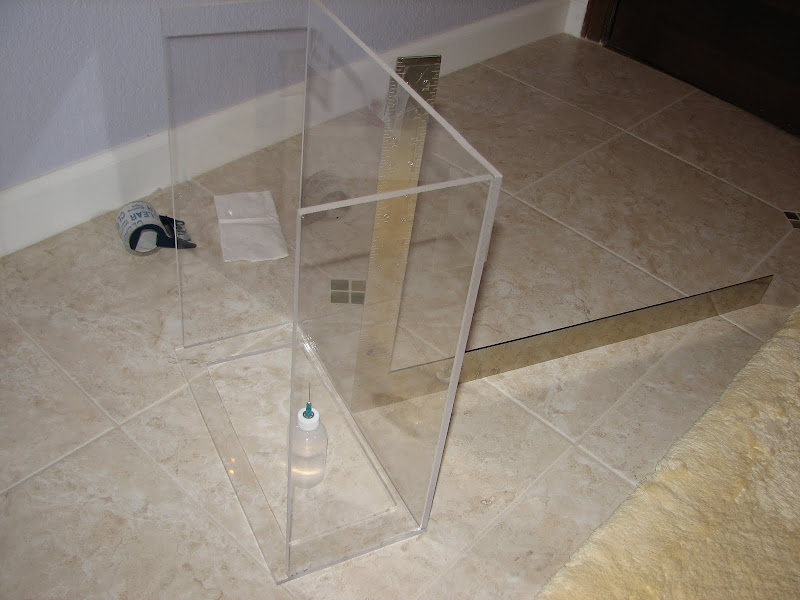
I used liquid Acrylic cement, which is actually a solvent that melts and fuses the acrylic pieces together.
This cement makes for joints that are as strong as the base material,
but you do need to make sure your edges fit together without very large gaps.
Thanks to the guys at TAP plastics for giving me some pointers on acrylic fabrication.
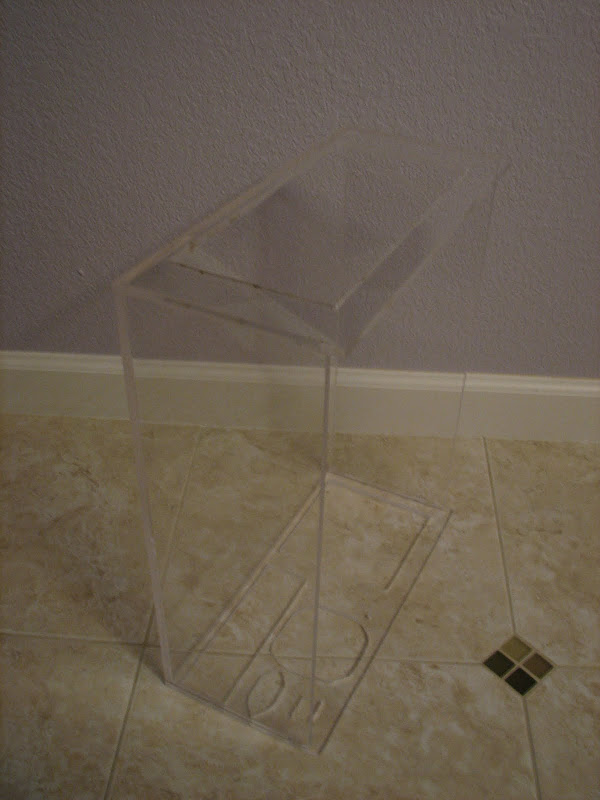
Cementing the rear plate (sitting on the floor) onto the rest of the pieces,
note the cutouts for the I/O panel, expansion cards, and PSU exhaust fan, power cord, and power switch.
I will call it: "White dwarf"
A star that has blown off its outer excess mass, leaving only a very dense white-blue colored core.
Likewise, my case design is devoid of all the bulk of regular computer cases,
only leaving behind the dense powerful components packaged into a small volume,
but with sufficient cooling to prevent it from going "supernova".
Quiet white LED fans gently let its presence be known.
I didn't have time before the deadline to apply some vinyl or paint as I would have liked,
but I did get the case finished to showcase my design concept and all of the components.
If I make it to the next stage, I will definitely add the vinyl for my primary sponsors.
Here is the case as it sits under the HDTV now,
the front fans are 120mm fans, so you can see how small of a profile this computer is.
Remember this system crams in a:
ASUS P7P55 Premium ATX motherboard;
ASUS GTX 260 GL+ video card (~11" long);
Antec Quattro 850W ATX power supply;
Swiftech complete watercooling system
(XT CPU block, Komodo GPU Full cover block, MCR220 240mm Radiator with 4x 120mm fans in push-pull configuration, MCP350 pump with EK acrylic top, and MCRES reservoir),
8x 128GB 2.5" SSD drives (one sponsored from Samsung):
No need for any external buttons!-
The ASUS TurboV Remote hanging on the upper right corner of the case can:
Power on the computer,
Choose one of three user-selectable overclocking presets (or underclocking for power savings),
Adjust Bclk (bus speed/base clock frequency),
and choose EPU mode (for power savings or maximum power for overclock)
3/4 view sitting on my desk/test area:
I'm not sure why the LED fans turned out Blue in this picture (maybe white balance?),
they are actually 120mm white LED fans..
Top view of the packaging of the components:
Top view of the relative size/scale of the case,
with your typical size magazine on top of the case-
Side view of the relative size/scale of the case,
with your typical 5.25" Bay DVD-ROM drive in front of the case-
This picture shows how tight the actual packaging is in some places,
here is a shot of (left to right)
MCP350 water cooling pump,
the G.Skill DDR3-2133 memory & sockets,
850W PSU,
ASUS Blue and Chrome CPU VRM heatsinks,
and the G.Skill 40mm memory kit LED fan that I moved to be on top of the VRM heatsinks to keep them cool.
The tube going from left to right feeds directly into the Swiftech Apogee XT CPU waterblock.
I'm actually kind of disappointed that you can't see the Swiftech Apogee XT block, that thing is dead sexy looking.
But at least you can still see the nice blue and chrome ASUS VRM heatsinks on the P7P55D Premium motherboard.
The PSU fits so tight on there, it actually sits on top of the 90 degree compression fittings coming out of the CPU water block.
Its a bit hard to see in the previous picture, but look where the modular cables come out, and look at the G.Skill heatsinks.
A bit of interference there, since the G.Skill heatsinks are kind of tall...
So yeah, had to do some "modifications" to be able to use some of those PSU modular connectors.
It fits as shown...
but I actually ended up just cutting those extra fins off, although I don't have a picture of that.
Some pictures of the acrylic case during fabrication,
here is gluing the sides onto the front faceplate/radiator intake fan area:
I used liquid Acrylic cement, which is actually a solvent that melts and fuses the acrylic pieces together.
This cement makes for joints that are as strong as the base material,
but you do need to make sure your edges fit together without very large gaps.
Thanks to the guys at TAP plastics for giving me some pointers on acrylic fabrication.
Cementing the rear plate (sitting on the floor) onto the rest of the pieces,
note the cutouts for the I/O panel, expansion cards, and PSU exhaust fan, power cord, and power switch.
Added a little summary/running video of it in action:
http://www.youtube.com/watch?v=SB2YDt2kdqo
Enjoy!
I sure hope I get chosen as a winner for stage 2!
I think I already know what those stage 2 prizes will be
http://www.youtube.com/watch?v=SB2YDt2kdqo
Enjoy!
I sure hope I get chosen as a winner for stage 2!
I think I already know what those stage 2 prizes will be