Enclosures and acoustic damping to help quiet them.
Moderators: NeilBlanchard, Ralf Hutter, sthayashi, Devonavar
-
Bluefront
- *Lifetime Patron*
- Posts: 5316
- Joined: Sat Jan 18, 2003 2:19 pm
- Location: St Louis (county) Missouri USA
Post
by Bluefront » Sun Jun 11, 2006 9:25 am
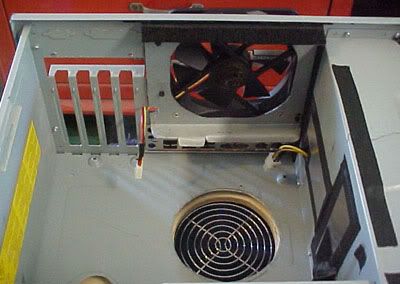
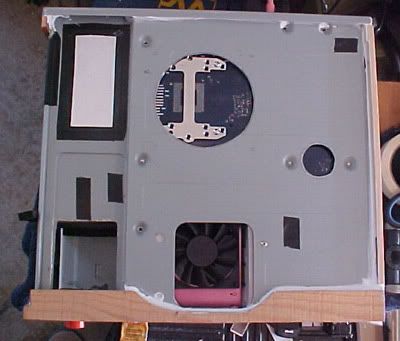
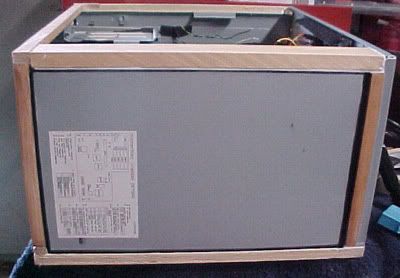
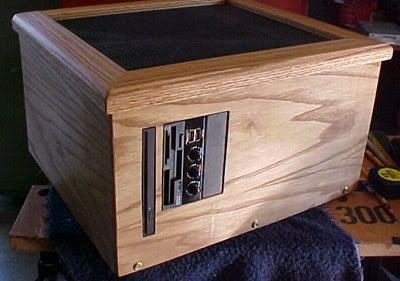
I've always wanted to build a wooden case, maybe make it look like an antique box of some sort. But the hard part is the guts of the thing. I think I've got it figured....I'm using the internal steel framework out of an older Compaq MATX case. This frame just slipped into a plastic/metal outer shell, which I'm not using.
The airflow will be similar to my just completed Aria project......with one exception. There will be a separate chamber that will house the hard drive and the PSU. It will have a 92mm fan blowing into the chamber, drawing from underneath the unit. There will be airflow from directly under the MB. All the exhaust from this chamber will exit the PSU opening as the photos show, The Fortron PSU will have it's own fan removed.....and will control the external fan (shown in it's possible location in the photos).
There will be a 120mm fan blowing into this case...the hole hasn't been cut yet. Another positive pressure case, the exhaust passively vented from the top rear...not shown yet. The front will be a stealth job...still on the drawing board. I expect the finished case to be oak, with an antique stain. Stay Tuned.....
Last edited by
Bluefront on Tue Aug 01, 2006 2:42 pm, edited 8 times in total.
-
GamingGod
- Posts: 2057
- Joined: Fri Oct 04, 2002 9:52 pm
- Location: United States, Mobile, AL
Post
by GamingGod » Sun Jun 11, 2006 10:52 am
HAHA I have that almost exact case and was gonna do the same thing
-
Bluefront
- *Lifetime Patron*
- Posts: 5316
- Joined: Sat Jan 18, 2003 2:19 pm
- Location: St Louis (county) Missouri USA
Post
by Bluefront » Sun Jun 11, 2006 11:20 am
Arrg...You mean this isn't an original idea?

Actually this should end up only slightly bigger than an Aria, depending on the thickness of the wood sides. It'll have only two fans, with most of the intake/exhaust from the rear. I'm considering using a
laptop optical drive like this, slot loading. Should make the stealth front easier.....only the small slot would need to be visible.
-
Mats
- Posts: 3044
- Joined: Fri Dec 26, 2003 6:54 am
- Location: Sweden
Post
by Mats » Sun Jun 11, 2006 12:58 pm
Unless you think a standard 5.25" DVD is too big for your small case maybe you should have a look at
this one.
Otherwise, Panasonic and Pioneer makes slim slot DVD writers. Don't forget the IDE adapter.
My µATX case would be smaller than an Aria (about 10" x 10" x 5") and made out of 2 mm sheet Aluminium, but I doubt it ever will be made....

-
Bluefront
- *Lifetime Patron*
- Posts: 5316
- Joined: Sat Jan 18, 2003 2:19 pm
- Location: St Louis (county) Missouri USA
Post
by Bluefront » Sun Jun 11, 2006 1:29 pm
Well that's an idea, and it would fit. But it would overlap the board by a few inches (just like that Aria case). I really want to avoid this.
The type and location of the optical drive is still to be determined. The original spot for the optical drive will now be occupied by the hard drive(s). So I'll have to do something different. I could make the slot opening on the left side of the case. That would really stealth the front.
I'm still open for suggestions here....
Oh I was thinking of making the front look like a drawer, only it would hinge down to gain access to the optical drive and some USB ports....just a thought.
-
Linus
- Posts: 184
- Joined: Fri May 21, 2004 12:47 pm
Post
by Linus » Sun Jun 11, 2006 1:40 pm
Bluefront - If you need a mounting adapter for a slim, laptop-style optical drive, check out eBay user
racksys. I've bought from him and his adapters are the cheapest I've found on the net.
Best of luck on the project - look forward to seeing your results!
-
Bluefront
- *Lifetime Patron*
- Posts: 5316
- Joined: Sat Jan 18, 2003 2:19 pm
- Location: St Louis (county) Missouri USA
Post
by Bluefront » Thu Jun 22, 2006 8:59 am
-
IsaacKuo
- Posts: 1705
- Joined: Fri Jan 23, 2004 7:50 am
- Location: Baton Rouge, Louisiana
Post
by IsaacKuo » Thu Jun 22, 2006 9:35 am
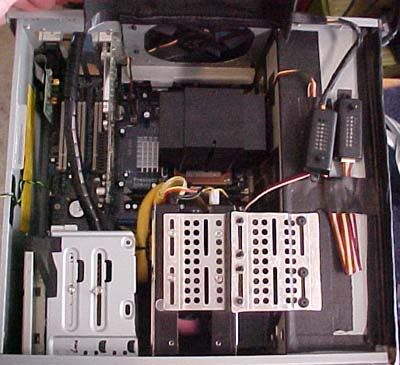
I'm skeptical about blowing warm air from that CPU heatsink into the case interior. My 2.4Ghz Northwood Celeron system also has a Scythe NCU1000, and initially I had it at the "front of the line" like you have. I experienced a big improvement when I reversed around the airflow so that it was exhausting air directly from the CPU heatsink rather than taking in air.
-
Bluefront
- *Lifetime Patron*
- Posts: 5316
- Joined: Sat Jan 18, 2003 2:19 pm
- Location: St Louis (county) Missouri USA
Post
by Bluefront » Thu Jun 22, 2006 2:10 pm
I know it goes against the grain.....but take a look at the setup. The air blown through the heatsink meets the airflow through the two drives blowing upward. And since heated air always rises, the natural airflow is up and out through the yet to be constructed, vented top. This airflow technique is perfect for a horizontal mother-board.
-
IsaacKuo
- Posts: 1705
- Joined: Fri Jan 23, 2004 7:50 am
- Location: Baton Rouge, Louisiana
Post
by IsaacKuo » Thu Jun 22, 2006 3:58 pm
Well, you'll be able to test it all out for yourself, of course.
My motherboard is also horizontal; this is my "black marble SFF" with the single 80mm fan. Your system looks similar in power. I'll bet you don't need the rear fan at all if you rely upon airflow from the hard drives to eventually exhaust out the rear CPU duct (assuming that's the only available exhaust hole).
-
Bluefront
- *Lifetime Patron*
- Posts: 5316
- Joined: Sat Jan 18, 2003 2:19 pm
- Location: St Louis (county) Missouri USA
Post
by Bluefront » Sat Jun 24, 2006 3:27 pm
Last edited by
Bluefront on Mon Jul 17, 2006 8:10 am, edited 1 time in total.
-
theyangster
- Posts: 424
- Joined: Sat Oct 01, 2005 9:08 pm
- Location: Somewhere over the rainbow....
Post
by theyangster » Sat Jun 24, 2006 5:19 pm
awesome

-
Bluefront
- *Lifetime Patron*
- Posts: 5316
- Joined: Sat Jan 18, 2003 2:19 pm
- Location: St Louis (county) Missouri USA
Post
by Bluefront » Sat Jul 01, 2006 4:10 pm
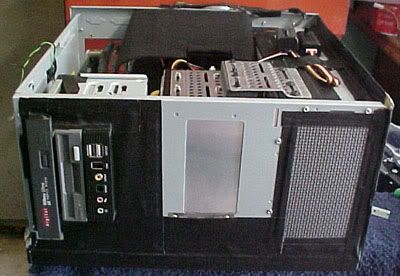
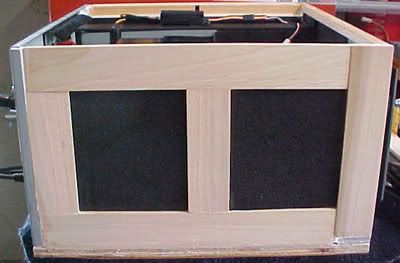
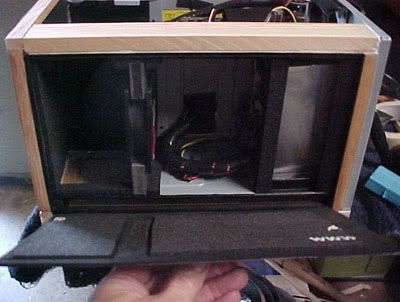
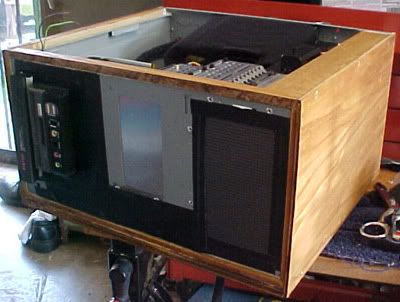
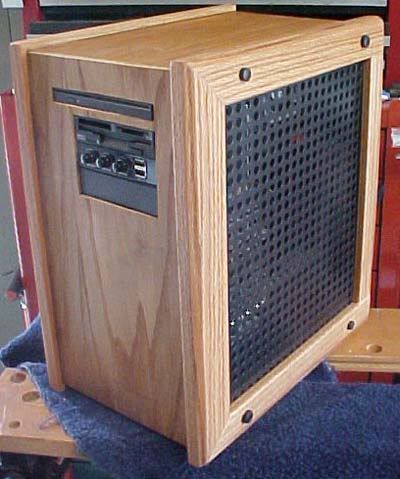
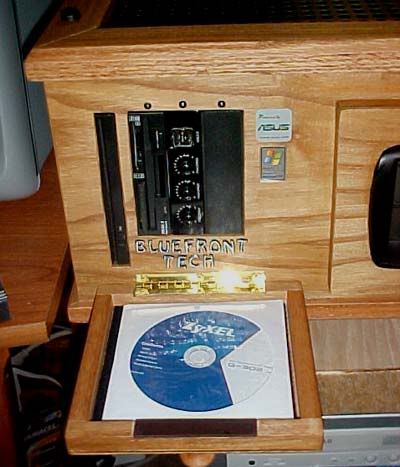
Further along now....the front bezel is in place. The optical drive is installed and working, a Pioneer DVD RW slot type. There's a card reader/floppy combo, a fan controller (probably will not be used), and an unused 3.5" bay.
I'm still working on a stealth/door mod for the front, and the mesh top is only in place for testing. The final top will look different. As it stands this thing is going to be really quiet. It's solid, but not too heavy. Other than the oak frame for the top, the rest of the wood is fairly light. It looks more massive than it really is.
I've got a few more ideas I'm considering. I think I'm going to make this setup either horizontal(like you see it), or a vertical tower with the PSU on the bottom. Shouldn't be too difficult. Haven't deceided on the final top design yet. I'm going to put a P4 in there to replace the test Celeron, and the heat difference may determine the final top.....more to come.
Last edited by
Bluefront on Mon Jul 17, 2006 8:08 am, edited 1 time in total.
-
Bluefront
- *Lifetime Patron*
- Posts: 5316
- Joined: Sat Jan 18, 2003 2:19 pm
- Location: St Louis (county) Missouri USA
Post
by Bluefront » Tue Jul 04, 2006 9:59 am
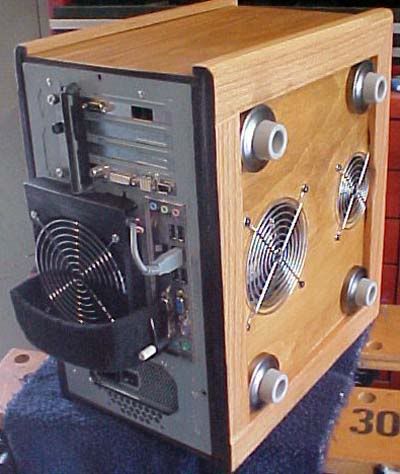
Yep....goes both ways, horizontal and vertical. I had to make a few internal changes to pull this off. To keep down a stagnant hot air build-up at the top of the case when vertical, I added a small fan over the card area blowing outward toward the mesh top/side.
Amazingly this setup runs almost the same temps at either orientation. There's an air deflection device over the rear intake fan, preventing the PSU output air from getting sucked back into the case. Still working on the front stealth mods.....and a few other things.
Last edited by
Bluefront on Mon Jul 17, 2006 8:05 am, edited 1 time in total.
-
Bluefront
- *Lifetime Patron*
- Posts: 5316
- Joined: Sat Jan 18, 2003 2:19 pm
- Location: St Louis (county) Missouri USA
Post
by Bluefront » Sun Jul 16, 2006 8:26 am
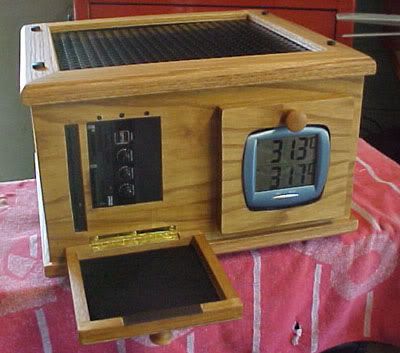
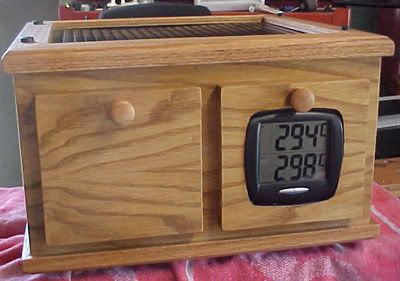
Except for some tweaking, maybe a new CPU heatsink, the case is almost finished. I upgraded the CPU to a P4-3.4 and the RAM to one gig. I was worried that the NCU 1000 could not handle a 3.4. Well it cools ok except under high ambient temps. At 29C ambient, the temps climb to the mid 50s during benchmarking.....at normal usage the setup runs cool.
The right door doesn't open, and holds an LCD temp guage. The left door hinges down to expose the drives. I'm still considering where/how to mount the power switch, and the power/hd lites. It does look like an antique of some sort. Heh....
Last edited by
Bluefront on Mon Jul 17, 2006 8:00 am, edited 1 time in total.
-
Cams
- Friend of SPCR
- Posts: 448
- Joined: Fri Feb 14, 2003 1:54 am
- Location: Isle of Arran
-
Contact:
Post
by Cams » Sun Jul 16, 2006 12:02 pm
Wow, that was worth logging in to see! Nice job indeed!
-
McBanjo
- Posts: 671
- Joined: Thu Dec 08, 2005 1:40 pm
- Location: Sweden
-
Contact:
Post
by McBanjo » Sun Jul 16, 2006 2:03 pm
Hmm, I really dislike that LCD gauge. Can't you modd it in some way to get a more antuiqe feeling? I wonder what a 100 year old LCD would look like

In worst case, paint it black so it fits in a little. Please?
The right nobb can be used as an on/off switch. When it comes to the leds I would probibly put the inside the computer, right under the top so you can see them if you want but they aren't really visible
It does look very nice
I might steal some ideas for my next case
-
justblair
- Posts: 545
- Joined: Fri Jul 15, 2005 12:33 pm
- Location: GLASGOW, SCOTLAND, UK
-
Contact:
Post
by justblair » Sun Jul 16, 2006 2:39 pm
Liking it bluefront... But I agree with McBanjo on that LCD display.
I am working on a 5'TFT display for my own project just now and I think I have an idea that would look uber good.
Hows about a 5'TFT panel (playstation one screen) mounted in the same place.
Using Samurize you can make up your own display in it with meters etc.
You can also choose your backdrop.
I would photgraph the a section of the wood your using to use as a backdrop, add some brass antique stye analogue meters on top and hey presto you have a highly customisable yet well blended front panel display.
Just an idea, but it would look cool IMO
I personally would get rid of the knobs on the front, either altogeher (with a finger nail groove on the top of the door) or with small metal fittings in place... I think the round knobs hint at quaker style, which isn't my favourite but of course may be yours.
Good work!
-
Bluefront
- *Lifetime Patron*
- Posts: 5316
- Joined: Sat Jan 18, 2003 2:19 pm
- Location: St Louis (county) Missouri USA
Post
by Bluefront » Sun Jul 16, 2006 4:40 pm
Thanks....the knobs are only stuck on for now. They can be changed, but I actually like them. That's the fourth set I've tried.
Now the display is another story.That door takes a few hours to make, and it's my third attempt. I really want a temp display up front. There is only 1/2" free space between the door and the case, so anything there bigger than a thin display will stick out somewhat. I've got a small play-station type display, but it doesn't look very good there. (tried it) I could paint the blue bezel of this temp display black, or partially cover it with a wood bezel. Maybe....
I'll have to look at this thing for a while....perhaps come up with another idea.
-
Howard
- Posts: 275
- Joined: Wed Feb 08, 2006 5:33 pm
Post
by Howard » Sun Jul 16, 2006 5:17 pm
Perhaps you can sand the bezel down and veneer it?
-
Bluefront
- *Lifetime Patron*
- Posts: 5316
- Joined: Sat Jan 18, 2003 2:19 pm
- Location: St Louis (county) Missouri USA
Post
by Bluefront » Mon Jul 17, 2006 7:52 am
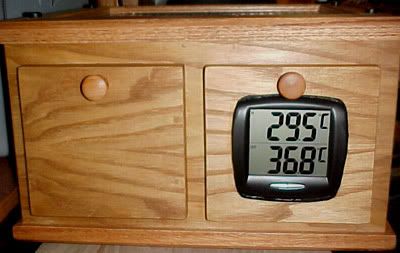
Yeah the blue had to go....painted it black. Much better. I might do something different, but this is not bad. That's a useful front display. It displays a remote temp, an ambient temp, the time, or any combination. Plus I can see it across the room.....
This case can sit horizontal or vertical, and can be used with/without a rear filter. In the winter it will operate cool enough to partially cover the exhaust vents with a more restrictive panel (that will be quieter). Right now it is almost silent when sitting in front of it.
The wood added a few pounds to the total weight, but not that much, since the panels are thin plywood. The heaviest part is the steel perforated vent panel. It's a cut-out piece of a cooking grill tray....heavy enough to set things on it. So far, so good.
Last edited by
Bluefront on Wed Jul 26, 2006 3:09 pm, edited 1 time in total.
-
McBanjo
- Posts: 671
- Joined: Thu Dec 08, 2005 1:40 pm
- Location: Sweden
-
Contact:
Post
by McBanjo » Mon Jul 17, 2006 10:06 am
Much bether
Anything else I can help with? Some day with a bit of practice you might acctually be good on this ;-P
-
justblair
- Posts: 545
- Joined: Fri Jul 15, 2005 12:33 pm
- Location: GLASGOW, SCOTLAND, UK
-
Contact:
Post
by justblair » Mon Jul 17, 2006 11:15 am
I concur.
The black fits in a lot better. Definately an improvement.
Looking forward to the next installment.
-
Bluefront
- *Lifetime Patron*
- Posts: 5316
- Joined: Sat Jan 18, 2003 2:19 pm
- Location: St Louis (county) Missouri USA
Post
by Bluefront » Tue Jul 18, 2006 11:11 am
In case anyone's interested in building a similar wood case, here are a few things to keep in mind.....
Wood Grain.....It will make or break the looks of the project. With a grainy wood like oak, it is absolutely necessary to carefully choose the particular pieces that will be visible. It's a personal matter of course, but it's you that will be looking at the thing. Be careful..
The front door.....Think about this a lot before you make any cuts. If you're careful, you won't have to do this more than once. This door has an internal clearance of about 1/2"....enough to store an optical disc or two. The clearance is enough to give space for some fan control knobs, plus I can leave a CF card in the drive and close the door. That's a strip magnet on the upper edge of the door. It holds tight against the three little steel wood screws over the drive openings. I can adjust the screws in/out to match up with the magnet. When the door is open, it rests against the edge of the lower frame. Makes it sturdy enough to set a beer or something on it. The three screws on the hinge are long enough to go through the thin plywood, and screw into the steel inner frame of the computer. That door is on there to stay. The cuts in the plywood bezel were made with a very fine-toothed metal jig-saw blade. I used masking tape to cover the openings before I did the cutting....prevents chipping of the edges. You might want to just tape the knobs on before you drill any holes....I'm still not certain if I'll use these particular knobs....
Intake/Exhaust problems.....If you have an intake right next to an exhaust, make absolutely certain the exhaust is not getting sucked back into the case. I can't stress this enough. If the exhaust is over the intake there is less of a problem. If the exhaust is under the intake you'll have to do something drastic. I'm using a simple deflection panel on the PSU exhaust, since this setup will sit horizontal......If I stand it upright I'll have to do something different.
-
justblair
- Posts: 545
- Joined: Fri Jul 15, 2005 12:33 pm
- Location: GLASGOW, SCOTLAND, UK
-
Contact:
Post
by justblair » Tue Jul 18, 2006 11:42 am
Makes it sturdy enough to set a beer or something on it.
In true homage to the noobies...
You included a cup holder!
-
Bluefront
- *Lifetime Patron*
- Posts: 5316
- Joined: Sat Jan 18, 2003 2:19 pm
- Location: St Louis (county) Missouri USA
Post
by Bluefront » Tue Jul 18, 2006 3:57 pm
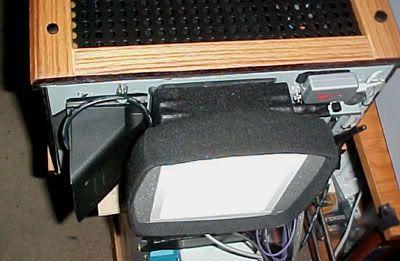
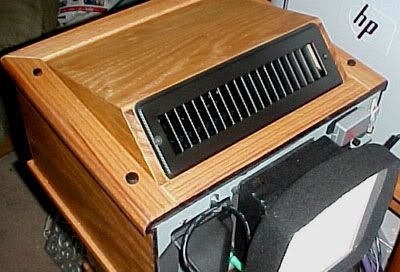
Here's the optional "silent top pro".
It just sits on the steel vented top, and pulls right off. With this top in place I cannot hear the thing from in front at all. I'll put some acoustic foam in there, under the slanted area, when I find the stuff (it got lost).
This is not a good time to make judgements on temperatures......there's a heat wave going on. The temp in my living room is 29.5C today. Hot. I expect this setup to run maybe 4C hotter than without the quiet top. Right now at 29.5C ambient, it's idling at about 38C......not bad. Since it removes easily I could always take it off if things get too hot. In the winter this should work very well........
I wonder if Thermaltake will duplicate any of this stuff.......

-
McBanjo
- Posts: 671
- Joined: Thu Dec 08, 2005 1:40 pm
- Location: Sweden
-
Contact:
Post
by McBanjo » Tue Jul 18, 2006 4:22 pm
What material do you use for those ducts?
Is there any noticable gain with a fan under the motherboard?
-
Bluefront
- *Lifetime Patron*
- Posts: 5316
- Joined: Sat Jan 18, 2003 2:19 pm
- Location: St Louis (county) Missouri USA
Post
by Bluefront » Tue Jul 18, 2006 5:15 pm
That vent in the picture is a 4"x10" register vent from Home Depot. I had to paint it black.....about $5.
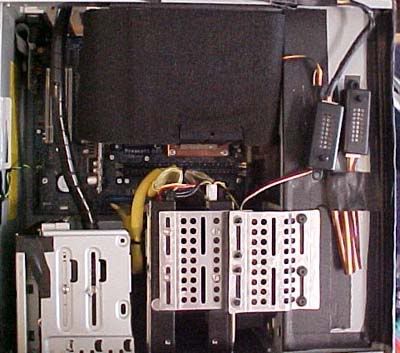
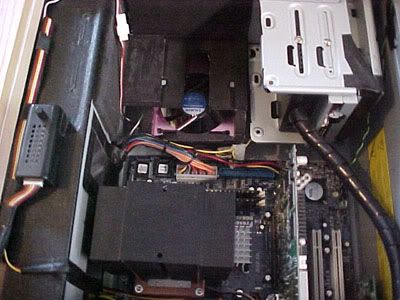
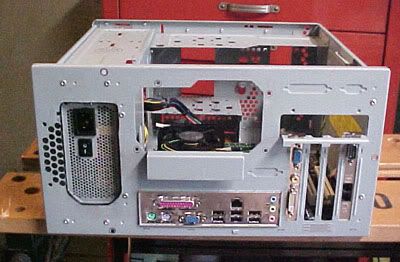
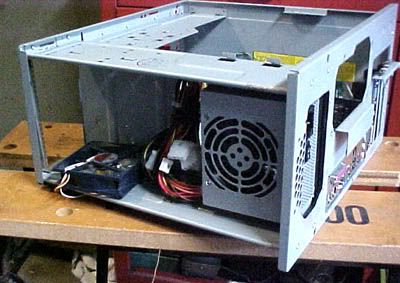
I know it's hard to tell or even see the air duct under the MB.......There's about a 3/4" air space under the MB tray. The tray itself has a 120mm hole under the CPU area. The very bottom of the case has another 120mm hole to the outside. The 92mm Nexus PSU fan located in the PSU chamber is sucking out of this air chamber. So the PSU is actually venting the underside of the MB.
The hard drives have their own 80mm fan also drawing air from this lower chamber, and from the smaller 80mm opening on the bottom of the case. That air is blown into the main case area.
Complicated airflow.....but it seems to be working just fine.
This setup is partially visible in the third photo from the top of this thread.
-
McBanjo
- Posts: 671
- Joined: Thu Dec 08, 2005 1:40 pm
- Location: Sweden
-
Contact:
Post
by McBanjo » Tue Jul 18, 2006 5:58 pm
I wonder if Thermaltake will duplicate any of this stuff.......
Wrong grammatics...it should be "when", not "if"
I was refering to that black carpet-looking duct material you are using. We posted at the same time so I didn't see that silent top until now
So the airintake is more for the PSU rather than cooling the MB? Any advantage besides being a neat idea? If cooling the bottom of the MB is an advantage it might be worth to consider during my next build
BTW How can you afford doing all these projects and where do you do with them when you are done? A person can only use so many cases until they are needed to throw away or sell some
-
Bluefront
- *Lifetime Patron*
- Posts: 5316
- Joined: Sat Jan 18, 2003 2:19 pm
- Location: St Louis (county) Missouri USA
Post
by Bluefront » Wed Jul 19, 2006 4:02 am
Many of the ducts you see in my photos are thin aluminum sheets covered with sticky-back felt. It can be bent easily and will hold it's shape. You can see this felt on the filter housing in this project. The felt definately deadens sound reflections off hard surfaces.
This computer case building is a hobby of mine.....expensive, but a whole lot cheaper than the bar scene. If I start a new project I might steal pieces from an older project. Sometimes I sell the things, but mostly the older projects are stacked in the basement. Lucky for me I don't have a wife to complain about this computer thing.