
I used coretemp64 and prime95 for test. I do have some suggestions on the IC diamond application. The material is very dry and doesn't spread very well at all. I used a razor to apply a layer of thin dry paste. I wonder if it's possible to mix AS5 and IC diamond together? I imagine they are both inert to one another...get a little better performance and easy to apply solution.
The MB temp readings are from the bios, so may not be accurate.
arctic silver
*****************************
idle
core0 core1
23c 30c
MB temp 36C
Load
core0 core1
59c 62c
MB temp 38C
IC Diamond
******************************
idle
core0 core1
22c 29c
MB temp 36C
Load
core0 core1
58c 61c
MB temp 39C
Innovation Cooling IC Diamond 7 TIM Giveaway/Testing
Moderators: NeilBlanchard, Ralf Hutter, sthayashi, Lawrence Lee
-
Innovation Cooling
- Posts: 40
- Joined: Tue May 12, 2009 9:45 am
- Location: ANSONIA CT. USA
http://innovationcooling.com/applicatio ... ctions.htmIMOM wrote:I used coretemp64 and prime95 for test. I do have some suggestions on the IC diamond application. The material is very dry and doesn't spread very well at all. I used a razor to apply a layer of thin dry paste. I wonder if it's possible to mix AS5 and IC diamond together? I imagine they are both inert to one another...get a little better performance and easy to apply solution.
The MB temp readings are from the bios, so may not be accurate.
Hard to break old habits which is one reason why I run these giveaways.
The application method we use for IC Diamond was developed by forum test/users in the early giveaway's on 4 forums and determined by the users as the best method after using the common methods razor,line, dot, finger spreading etc. to be the optimal for ease of use and performance .
This was subsequently lab tested by IC and confirmed as the best method of retail use. For OEM a solvent is added to thin it and then silk screened on in standard process.
Mixing IC Diamond with AS5 only degrades IC Diamond with increasing amounts you end up with AS5 performance and reliability which defeats the point of this exercise.
-
Praxis1452
- Posts: 13
- Joined: Sat Dec 23, 2006 11:07 pm
I believe you have a great product...AS5 may degrade the IC diamond product, but I really was just suggesting a way of making the dry paste a little more easy to spread and apply. I was trying to fill completely and evenly and it took 10 to 15 minutes to do it and even then it would take more time to make sure it was even enough so there weren't any pockets when you place the heatsink on top.
I don't mind change, but think of a way of slightly diluting the solution so it can spread easy would be a big help.
It took AS5 several revisions to be a very effective TIM solutions for the PC hobbyists. I think an IC2 or second generation product would be awesome...and yes I'm picking the little details as it seems to be as good and better than AS5.
Old habits do die hard...but also not all applications will allow for good compression heatsink mount...such as the north and southbridge heatsinks. So IC diamond may not be optimized in this application because there's only two mounting points versus a CPU heatsink mount which has a lot more pressure.
I rather waste a little more IC diamond paste and get it done right the first time then having to mess with it over and over. Making it easy to spread and void out air pockets would make for easy application of the dry paste.
Huge bonus for IC diamond is that it's not electrically conductive compared to AS5.
-
Innovation Cooling
- Posts: 40
- Joined: Tue May 12, 2009 9:45 am
- Location: ANSONIA CT. USA
I understand that people like or are used to a particular viscosity or workability in their compounds as well as performance.IMOM wrote:I believe you have a great product...AS5 may degrade the IC diamond product, but I really was just suggesting a way of making the dry paste a little more easy to spread and apply. I was trying to fill completely and evenly and it took 10 to 15 minutes to do it and even then it would take more time to make sure it was even enough so there weren't any pockets when you place the heatsink on top.
I don't mind change, but think of a way of slightly diluting the solution so it can spread easy would be a big help.
It took AS5 several revisions to be a very effective TIM solutions for the PC hobbyists. I think an IC2 or second generation product would be awesome...and yes I'm picking the little details as it seems to be as good and better than AS5.
Old habits do die hard...but also not all applications will allow for good compression heatsink mount...such as the north and southbridge heatsinks. So IC diamond may not be optimized in this application because there's only two mounting points versus a CPU heatsink mount which has a lot more pressure.
I rather waste a little more IC diamond paste and get it done right the first time then having to mess with it over and over. Making it easy to spread and void out air pockets would make for easy application of the dry paste.
Huge bonus for IC diamond is that it's not electrically conductive compared to AS5.
There is a down side to it as the thinner pastes while they "wet" the surfaces real nice out of the gate and give good performance many are under the Intel recommended bulk loading of 90% This causes pump or bake out which is basically a failure of the TIM.
IC Diamond while thick out of the gate actually gets thicker with use. This is by design it kind of "sets up" into a wax or crayon like consistancy remaining pliable. The idea behind it is that it is easier to pump out a liquid than a solid so long term you will not see a degradation in temperature.
I have an IC Diamond installation that's been running close to 3 years with no change in performance since the initial install.
The unappreciated trick here is high performance AND long term reliability
Peanut butter will give you OK temperature results but only for a few hours so what good is it?
If you spend $5.00 on a tube of Paste and the performance advantage is lost in a few weeks or in a few hundred hours of use maybe you would be better off using peanut butter if you change you sink often?
To see an example of bake-pump out vs IC diamond follow the link
http://www.maximumpc.com/forums/viewtop ... c&start=48
-
Innovation Cooling
- Posts: 40
- Joined: Tue May 12, 2009 9:45 am
- Location: ANSONIA CT. USA
Thanks for the extra effort on the tests.Praxis1452 wrote:Ok so I finally got my system back together and here are the new results.
e8500. Stock frequency and vcore.
AS5
idle: 39C
load: 50C
IC
idle: 39C
Load: 46C(temperature of the highest core. One has always been a few degrees above the other.)
this is at roughly the same ambient temps.
Great job
How would you like me to count it in the overall when I update the performance results Chart?
I can average both results or not include the first result. It's up to to decide what reported number is fair
I'm sure you are right, since you are the manufacturer. It would be very silly for me to argue the points how to apply your product. The biggest concern for me was if I did put 5mm bead instead of spreading it like the tradition old school method of use a razor applying an even coat was user installation... If I the user didn't apply it on correctly, say I snap the latch of the heat sink on one side first and pushed too hard, so it squeezes a lot of the material to the right, then I snap the latch to the right and some will squeeze back to the left, but more will squeeze to the right. So the spread is not so even.
This is more so with the North and Southbridge where it's only two mounting holes.
I never questioned the perforamnce of IC diamond...just the pain of spreading it the material. Even if you instructed the users to put a bead in the center...I rather over apply IC diamond since it's non conductive and make sure I get good coverage than not enough. You are right, $5 version $700 to $1000+ for a system is the reasons why old habits die hard and the school of thought full coverage with the razor spreading versus a 5mm center bead and letting the pressure spread the through out the CPU, northridge, southbridge, GPU applications.
The $5 to $10 doesn't bother me in regards to considerable more money invested in our PCs. Thanks for the replies and hope you appreciate some user feedback.
-
Innovation Cooling
- Posts: 40
- Joined: Tue May 12, 2009 9:45 am
- Location: ANSONIA CT. USA
IMOM wrote:I'm sure you are right, since you are the manufacturer. It would be very silly for me to argue the points how to apply your product. The biggest concern for me was if I did put 5mm bead instead of spreading it like the tradition old school method of use a razor applying an even coat was user installation... If I the user didn't apply it on correctly, say I snap the latch of the heat sink on one side first and pushed too hard, so it squeezes a lot of the material to the right, then I snap the latch to the right and some will squeeze back to the left, but more will squeeze to the right. So the spread is not so even.
This is more so with the North and Southbridge where it's only two mounting holes.
I never questioned the perforamnce of IC diamond...just the pain of spreading it the material. Even if you instructed the users to put a bead in the center...I rather over apply IC diamond since it's non conductive and make sure I get good coverage than not enough. You are right, $5 version $700 to $1000+ for a system is the reasons why old habits die hard and the school of thought full coverage with the razor spreading versus a 5mm center bead and letting the pressure spread the through out the CPU, northridge, southbridge, GPU applications.
The $5 to $10 doesn't bother me in regards to considerable more money invested in our PCs. Thanks for the replies and hope you appreciate some user feedback.
The recommended application is about as easy as it gets and covers about 95% of applications. The thickness issue was a design trade off for reliability
If you are in the 5% coping with an oddball application issue I would get some solvent like acetone ( I buy mine from Home Depot -no oils or fragrance contaminants) and add a drop or two and mix to your desired consistency, apply and let it dry for 10 - 20min, then mount the sink.
Ever see a heat sink with the pre - applied compound? That's the OEM solution - thin it with a solvent and silkscreen on and let dry.
IC 7 Carat Diamond results
Used on a volt-modded 7600GS AGP with Zalman VF700 fan @ 5.4V.
Using existing thermal compound (Tuniq TX-2):
Stock -
Idle: 48°C | Load: 58°C
OC (755 core/455 memory) -
Idle: 49°C | Load: 63°C
Using IC 7C Diamond:
Stock -
Idle: 47°C | Load: 58°C
OC -
Idle: 49°C | Load: 65°C
Looks like it's a little better at stock idle (-1°C), but is a little worse at OC load (+2°C). Thanks for the opportunity Innovation Cooling! I will definitely consider your products in my future purchases.
-
CroSsFiRE2.0
- Posts: 26
- Joined: Thu Jan 15, 2009 12:39 pm
- Location: Toronto, Canada
Nice, just received my sample in the mail today. Going to start testing soon but ambient temps are pretty high recently 
------------
Not finished testing yet but so far, the results are...good but inconsistent.
With OCZ Freeze on a E6750 @3.2 with a Ninja 2 and a slipstream at 400rpm.
Speedfan 4.38
Idle temps are 40C
Load temps are 59C
Rivatuner
Idle temps are 24
Load temps are 44
With the IC 7, no idle temps yet.
Load temps are around 57-60 in speedfan. No accurate temp possible since it keeps fluctuating for some reason between those temps. Didnt change anything in my computer either and ambient temps are still the same. Hovers around 58C the most.
Finally finished the testing - that 200-hour break-in time for Arctic Silver 5 is a hassle for this kind of comparison. Edit #2: CPU data has been updated.
Test system
Case: Rocketfish Aluminum Full-Tower
CPU: AMD Phenom II X4 940
CPU Cooler: Scythe Ninja Mini (GPU test)/Thermalright HR-01 Plus with AM2 Bolt-Thru Kit(CPU test)
GPU: Powercolor HD 4830 w/ Accelero S1 Rev. 2
Hard Drives: WD Caviar Blue 640GB/Samsung F1 1TB
Motherboard: Gigabyte GA-MA790X-UD4, AM3 Socket
Power Supply: Corsair 520HX
Fan setup
Intake/Exhaust fans: Yate Loon D12SL-12, ~1100 RPM
CPU fan: Stock Ninja Mini fan, ~1850 RPM/Yate Loon D12SL-12, ~1000 RPM
GPU fan: Enermax UC-12EB, ~750 RPM
I used Catalyst Control Center to monitor graphics card temperatures, and AMD Overdrive for the CPU (since it matches Core Temp's readings while allowing for slightly more precision). When available, I followed the TIM manufacturers' instructions for applying the pastes.
. . . . .
GPU test
Stock Arctic Cooling MX-2
--------------
Ambient: 25C
Idle: 30C
Furmark, after 15 minutes (windowed/1280x1024/no AA): 53C
Rise over ambient: 28C
IC Diamond 7
--------------
Ambient: 24C
Idle: 29C
Furmark, after 15 minutes (windowed/1280x1024/no AA): 47C
Rise over ambient: 23C
Improvement: 5C
Now that is an impressive performance! While temperatures may have been closer if I had applied the MX-2 myself instead of using the pre-applied patch - I don't know if there's any difference between the two - the results here speak for themselves. (Note: Since I could not find instructions for applying IC7 to the small die of a GPU, I followed the CPU guidelines but applied a 3.5mm bead rather than 5.0-5.5mm.)
. . . . .
CPU test
Arctic Silver 5
--------------
Ambient: 25.5C
Idle: 36C
Prime95, Large FFTs: 59.5C
Rise over ambient: 34C
IC Diamond 7
--------------
Ambient: 25.5C
Idle: 35C
Prime95, Large FFTs: 58.5C
Rise over ambient: 33C
Improvement: 1C
Not nearly as impressive as the GPU temps, but 1C is pretty good for a simple TIM swap versus a well-renowned competitor.
Last edited by ajkalan on Fri Jun 26, 2009 2:05 pm, edited 1 time in total.
-
Innovation Cooling
- Posts: 40
- Joined: Tue May 12, 2009 9:45 am
- Location: ANSONIA CT. USA
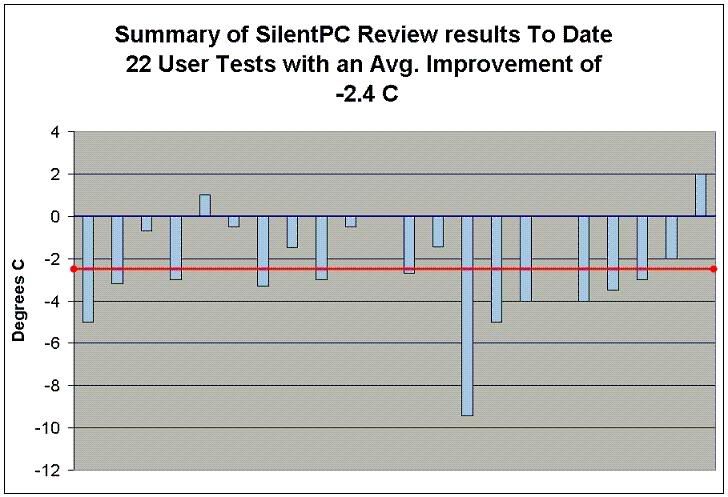
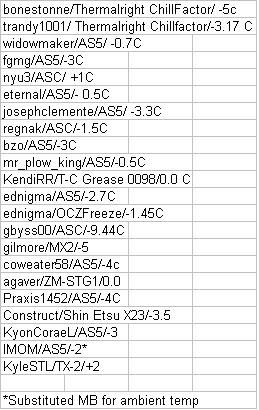
Summary of ongoing IC Diamond test results, any mistakes on my part let me know and I will make the adjustments.
Looks like we are rolling along pretty well, you guys could put me over the 400 sample mark.
And yes we still have samples available
22 Tests - 18 showed an improvement, 2 Users "0.0" Change and 2 users experienced higher temperatures
Looks like we are rolling along pretty well, you guys could put me over the 400 sample mark.
And yes we still have samples available
22 Tests - 18 showed an improvement, 2 Users "0.0" Change and 2 users experienced higher temperatures
-
Innovation Cooling
- Posts: 40
- Joined: Tue May 12, 2009 9:45 am
- Location: ANSONIA CT. USA
Not sure what's up with the GPU's but the numbers are usually pretty good when anybody does that kind of application.ajkalan wrote:Finally finished the testing - that 200-hour break-in time
GPU test
Stock Arctic Cooling MX-2
--------------
Ambient: 25C
Idle: 30C
Furmark, after 15 minutes (windowed/1280x1024/no AA): 53C
Rise over ambient: 28C
IC Diamond 7
--------------
Ambient: 24C
Idle: 29C
Furmark, after 15 minutes (windowed/1280x1024/no AA): 47C
Rise over ambient: 23C
Improvement: 5C
Now that is an impressive performance! While temperatures may have been closer if I had applied the MX-2 myself instead of using the pre-applied patch - I don't know if there's any difference between the two - the results here speak for themselves. (Note: Since I could not find instructions for applying IC7 to the small die of a GPU, I followed the CPU guidelines but applied a 3.5mm bead rather than 5.0-5.5mm.)
. . . . .
I am having a nice run now with the notebook GPU's on the Notebookreview forum. Somebody got the idea that the paste was thick enough to gap the installed pad on the GPU. Maybe I should start tracking those numbers as well.
Re: Innovation Cooling IC Diamond 7 TIM Giveaway/Testing
I'll agree to test ICD7, if you haven't gotten 100 responders yet.
Thanks!
Thanks!
Ready to test ICD7 *place holder for results*
Here are the results:
System:
Intel Stock Heatsink with pink guck moved
E6750 overclocked to 3.2ghz (400fsb)
4 gig ram
Windows XP SP3
1 HD, 1 DVDRW
Nvidia 8800GT
Testing program:
Intel Thermal Analysis Tool (measured 17 celcius lower than OCCT readouts)
IC Diamond: [tests were done after 3 hours of 100% load on cpu for curing as per ICD7 instructions]
Idle ambient: 21 cel
cpu0: 18, cpu1: 20
Load (1.0 hours)
Ambient: 21 cel
cpu0: 51 cpu1: 51
AS5 (without 120 hour settling in [tested 10 mins after installing]):
Idle ambient: 21 cel
cpu0: 17, cpu1:21
Load (1.0 hours)
Ambient: 21 cel
cpu0: 53 cpu1: 54
2nd test with different PSU:
Both TIM applied as instructed by manufacturer's method on webpages. Temperatures measured using Intel TAT after 2 hours of load.
AS5 (200 hour cured)
idle: 17, 20
ambient: 20.5 c
load (1hour 10 mins): 54, 53 (maximum)
IC7 Diamond (2 hour cured under 100% load):
Ambient: 20c
idle: 19, 22
Max: 53, 53
**This marks the end of my 2 tests. Thank you SPCR and Innovative Cooling for allowing me to test such an excellent product. It is certainly a contender for my future purchase!
Last edited by Callous on Fri Jul 24, 2009 5:17 pm, edited 4 times in total.
Updated cooling results
IC,
I retested after some burn-in time and the stock temperatures and OC idle were identical to my initial test, and the OC load dropped 1°C to 64°C. Please update your graph to be +0.5°C for me (average of the two load temperature). I think it's only fair to include all data, instead of just the pessimistic OC temperatures.
Kyle
my results
I finally recieved my ICD7 sample and played around with my new rig.
I have a Intel Q8200 with a TRUE and antec tricool 120 on it using lowest setting. I used prime 95 to measure load after about 1 hour running
Before I changed TIMs I was using AS5.
Idle:
Core0: 35C
Core1: 37C
Core2: 35C
Core4: 34C
Load
Core0: 60C
Core1: 61C
Core2: 60C
Core4: 59C
After ICD7
Idle:
Core0: 36C
Core1: 37C
Core2: 34C
Core4: 34C
Load
Core0: 60C
Core1: 61C
Core2: 61C
Core4: 60C
I read over the directions and post and followed the application instructions -- one bead in the middle of the CPU and attach the CPU. Too bad I don't see the gains that other's have reported.
-
MrDeodorant
- Posts: 1
- Joined: Sat Jul 04, 2009 12:45 pm
- Location: Canada
I agree to test ICD7, if you still have some available.
I've been trying to order this stuff since I saw the first wave of tests on OCN. I have a home theater with an e2140 cooled with an e8400 stock cooler (it was a spare-part computer), and I'd love an excuse to test ICD7 against the Arctic Cooling synthetic compound I'm using now, and then (obviously) lap it and see how cool I can get it.
I've been trying to order this stuff since I saw the first wave of tests on OCN. I have a home theater with an e2140 cooled with an e8400 stock cooler (it was a spare-part computer), and I'd love an excuse to test ICD7 against the Arctic Cooling synthetic compound I'm using now, and then (obviously) lap it and see how cool I can get it.
I agree to test ICD7
i7 920 on MSI X58 Platinum SLI w/ stock hsf
AS5 30 degrees C
Diamond7 28 degrees C
-2 degrees average - sold!
Oh, and recommended application was used. pea sized seemed a bit much to me but seemed to be the ticket. What is the effect of the stuff squeezing into the cracks in a direct heat pipe heat sink. i.e. heatsink-crack-pipe-crack-heatsink-crack-pipe etc etc
Last edited by rip on Mon Jul 27, 2009 10:46 am, edited 2 times in total.
-
slimeballzz
- Posts: 268
- Joined: Tue Mar 11, 2003 5:17 pm
- Location: Canada
My results:
Arctic Cooling MX-2
Intel Q6600 @ stock speed/voltage
Ambient temp: 26.4°C
Idle:
Core 0: 37°C
Core 1: 34°C
Core 2: 30°C
Core 3: 31°C
Load (OCCT for 1 hour):
Core 0: 44°C
Core 1: 42°C
Core 2: 37°C
Core 3: 38°C
IC Diamond 7
Ambient: 26.8°C
Idle:
Core 0: 36°C
Core 1: 33°C
Core 2: 28°C
Core 3: 31°C
Load:
Core 0: 43°C
Core 1: 40°C
Core 2: 35°C
Core 3: 36°C
Last edited by slimeballzz on Sun Jul 12, 2009 9:43 pm, edited 2 times in total.
-
Innovation Cooling
- Posts: 40
- Joined: Tue May 12, 2009 9:45 am
- Location: ANSONIA CT. USA
Sorry for the long delay, but I finally got around to installing the TIM over the weekend. My CPU is an AMD Athlon 64+ 3700 (single core) that has the stock AMD heatsink/fan, and used to have the stock AMD TIM too. The system was stressed for 15 minutes using Prime95 and measured with CoreTemp. Here are my results:
With stock TIM: Ambient 22C, Idle 41C, Load 67C
With IC TIM, after ~5 hours to burn in: Ambient 22C, Idle 39C, Load 66C
I followed the directions about putting a bead in the center of the CPU and then attaching the heatsink. Based on the results though, I am however worried that maybe I put too little of the TIM on. So I have three comments/questions.
1. The instructions say to put a 5mm circular bead in the center, but it doesn't say anything about height. Really the operative measurement is the volume of the TIM that must be used, so perhaps you could state that. In fact, ideally the syringe could be labeled, so it would be easy to measure exactly how much is needed.
2. The website shows the risk of using too little of the paste, but what happens if you use too much? With poor-quality pastes this is a huge no-no (as I understand it anyway), but perhaps with yours it isn't so bad? If so, you should maybe include that in the instructions so people err on the side of using too much.
3. Suppose that I did in fact use too little of the paste, and as a result have a problem like Figure 7 in your application methods page. What is the best way to fix this? Can I simply pop open the heatsink and insert a bit more of the paste, hoping it will smooth out? Or do I have to remove all of the current paste and start over?
Overall the IC TIM did do better than the stock one, but not by as much as I (and probably you) hoped. If you have any suggestions to help me out, hopefully I can return better data
-
Innovation Cooling
- Posts: 40
- Joined: Tue May 12, 2009 9:45 am
- Location: ANSONIA CT. USA
There might be an application issue but it seems to me you are on track there. Using our method vs. one that might trap some air might degrade performance a degree or two the issue on that point is more one of long term reliability, the air can spread/expand under pressure/heat and cause the mount to fail.
If you were using a more competitive baseline paste I might expect results to be closer but with stock pastes our average improvement is 4.74C with 26 user tests - 2 users with "0.0C" change in performance/2 users with +1 C and 22 users showing improved performance with only one showing +1C you can see the result here http://innovationcooling.com/Multiforumtestresult.htm
I have another giveaway at notebook review that is a little slanted in my favor right now because about half are replacing stock pastes + smaller die with higher heat fluxes favor IC Diamond so my average is up to an improvement of 5.74 C
So I would check out our Contact and pressure tests http://innovationcooling.com/Indepanden ... etest.htm For trouble shooting most problems
80% see a result out of the gate out of the 350+ reported results
we performed a study early on in our giveaways with some contact/pressure (c/p) film to trouble shoot the 20% who did not see a result.
80% of the 20% (80 20 rule) no result or marginal result group were determined to have either poor contact or a contact pressure under 50 PSI. The remaining 4 out of 100 we have no explanation for. 96% accounted for
Some sub tests were conducted with some users where they applied shims to increase pressure or lapped their sinks/IHS to improve contact and all had improved performance. This is probably the two most recommended solutions on all forums to troubleshooting paste/heat sink temp problems and the Pressure film results basically confirm what most know from experience.
Probably at least 80% of those tested have good pressure/contact to begin with. Pressure problems can arise with hardware tolerances, as an example Intel specs lower than the sink retail market. for instance the stock sinks are 43lbs +/- 10 PSI so you could be 53lbs or 33lbs from memory I think the max board load is somewhere in the high 70's 77 - 78 lbs something like that range.
In any event the c/p tests covered a non trivial 9C range and regardless of compound used attention to detail matters when trying to optimize your temps.
Like silent computing you have to treat all noise sources until you reach a satisfactory level. The same applies to thermal problems -devil is in the details
Thanks for the feedback. In case you haven't noticed, I know almost nothing about heatsinks, which is why I still had the stock ATM heatsink and paste. I did notice that the finish on the heatsink was rather poor though, so lapping it would probably help me reduce temps.
I'm not really concerned with the temp on my computer though, just why the test results were not great. The test was done with both TIMs on the same (poorly lapped) heatsink, so at least it's an apples-to-apples comparison. But I suppose it's possible that with a better heatsink, I would see a better improvement.
I'm not really concerned with the temp on my computer though, just why the test results were not great. The test was done with both TIMs on the same (poorly lapped) heatsink, so at least it's an apples-to-apples comparison. But I suppose it's possible that with a better heatsink, I would see a better improvement.
-
Innovation Cooling
- Posts: 40
- Joined: Tue May 12, 2009 9:45 am
- Location: ANSONIA CT. USA
may012 wrote: . But I suppose it's possible that with a better heatsink, I would see a better improvement.
Thanks for taking the time to test much appreciated
Thermal performance of paste remains independent of the sink other than the contact/pressure issue.
If you have a stock sink vs a larger retail sink , the stock sink temp will be higher as well as the CPU temp as well as the paste temp - But the thermal resistance or C/W of the paste does not change. 100W in both scenarios with equivalent/homologous C/P The compound experiences the same temperature rise across the compound in both cases.
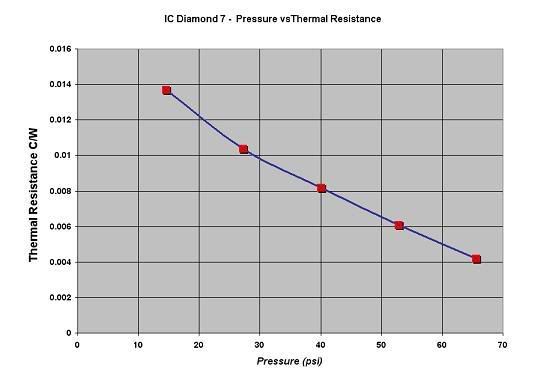
Again the problem resolves down to contact or pressure in most situations, sink effectiveness has no effect on compound performance, good Contact/Pressure is critical for good results. Relative flatness/finish of the sink base/IHS or mounting pressure are key to extracting the performance out of IC Diamond or any other Compound. Most paste have similar type pressure/performance curves as the ICD Curve pictured below.
-
Innovation Cooling
- Posts: 40
- Joined: Tue May 12, 2009 9:45 am
- Location: ANSONIA CT. USA
[quote="Compddd"]When I do the bead in the center of the CPU, do I have to wait 10-15 mins for it to cure? Or were those the old instructions for IC7?[/quote]
Old instructions - Use http://innovationcooling.com/applicatio ... ctions.htm
where did you find them?
Old instructions - Use http://innovationcooling.com/applicatio ... ctions.htm
where did you find them?